How to create Accelerated Mobile Pages in Magento 2
What is Google AMP and how to implement it on Magento 2 via module? Read more in this article.
Fast and responsive mobile web experiences aren’t a dream anymore; they’re hot and happening. In the world we live in now, no one wants to wait an extra millisecond for a site to load; and often times studies show that, they don’t. The bounce rate for sites loading slower than 3 seconds is upwards of 53%.
However, not to be alarmed, there are several ways to solve this problem, and Accelerated Mobile Pages (AMP) from Google is one of them. Besides the usual advantages adding an AMP offers in terms of user experience and increasing conversion rate, it also has an impressive list of SEO-advantages for sites being searched on Google.
Have a look at a few of these quick facts:
- Recently Google switched to mobile-first indexing: instead of fetching the desktop site version, Googlebot now fetches information about the mobile version first.
- Also, Google have recently stated that AMP is one of it’s top ranking factors, so its implementation not only makes your site mobile friendly, but increases the site’s positions in Google search results.
- Another advantage is that AMP supports all major SEO tools such as Google Analytics, AdWords Conversion Tracking, Google Tag Manager and lots of the others.
- As AMP sign in the search results attracts additional attention of users, implementation of AMP improves Click-through rate as well.
- And finally, AMP supports a lot of online ads. AMP checks ad banners for security and loads them much faster than typical pages via special components.
So it is no wonder that the site requirement scopes we’re receiving from clients include more ad more requests for AMP’s.
Contents
- How does AMP work?
- Restrictions in AMP-code you should be aware of:
- Do I need to implement it? What is SEO’s problem with AMP?
- How to submit AMP pages to Google?
- The bare minimum you need to make your page AMP-valid:
- Do I need to create AMP versions of all my pages on Magento?
- How to create Magento AMP compliant pages via module
- AMP components
- AMP validation
- How can AMP be combined with PWA?
How does AMP work
Speaking of technologies and all the great stuff that makes these pages tick, AMP pages are built with three main elements:
- AMP HTML
- AMP Javascript
- Google AMP cache
The first element is a restricted version of HTML. Some tags, attributes, and styles are restricted for use or replaced by tags from the AMP HTML library. This can help you to accelerate site loading speed on mobile devices by up to less than 1 second by sacrificing some elements made via HTML and Javascript customizations.
The second element is AMP JavaScript libraries, which work asynchronously and guarantees fast page loading. It’s important to note that any custom or third-party JavaScript use is restricted, but the number of AMP JS components is quite wide, so you will be able to cover most of your site’s functionality. We’ll dive into most of this part a bit later.
The third is AMP Google Cache. If your page meets all the requirements and passes the AMP validation test, then it will be indexed by Googlebot and added to the Google CDN. So, when you search for a page on Google, it will be loaded instantly from the AMP Google Cache even if your internet connection is poor.
Restrictions in AMP-code you should be aware of
- First of all, you can not attach files with custom styles and custom/ third-party javascript.
- All styles must be written in a special <style amp custom> tag and only appear in one place on the page, there cannot be multiple such tags. Additionally, the size of the styles should not exceed 50 kb.
- It is forbidden to use “! important” property in styles and name style classes with “-amp-”, because these classes are reserved by AMP JS library.
- All script tags are forbidden, except for the “application / json” or “application / ld + json” type.
- You can not use <img>, <video>, <audio>, and <iframe> tags they are replaced with special AMP tags.
- Tag <a> must not contain Javascript.
- Attribute names starting with on (such as onclick or onmouseover) are restricted in AMP.
- Remote fonts can be added only if they support HTTPS.
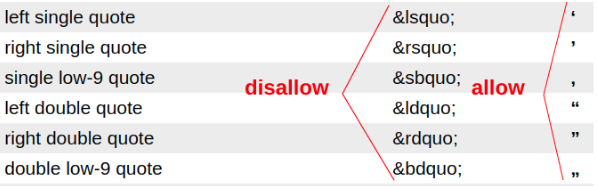
- Special characters (such as those shown in the picture below) are not allowed. We recommend checking a product description and other text attributes as they may contain restricted characters in Magento.
Cross-Origin requests in AMP
Let’s assume you googled the AMP product page, opened it, and clicked the update price button. You should realize that at this moment you are currently on the Google AMP Cache page, and your domain is different from your real site domain because all pages instantly returned from the Google Cache contain “cdn.ampproject.com” in the URL. Being located on the google CDN page, you send a request to a resource with a different domain.
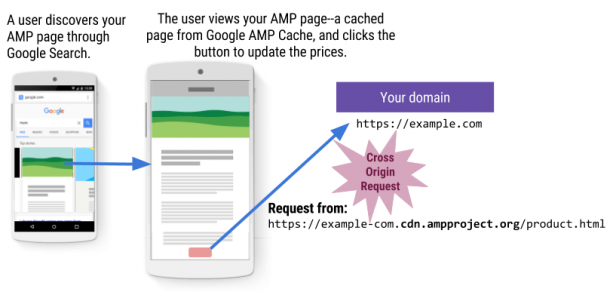
For this to work correctly, AMP adds its own headers.
The AMP CORS security protocol consists of three components:
- The CORS Origin header
- The AMP-Same-Origin custom header
- Source origin restrictions via __amp_source_origin
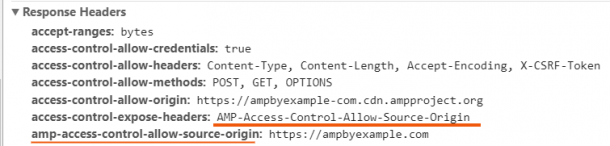
Lastly, the most important step is the “amp-access-control-allow-source-origin” header and the “amp_source_origin” parameter. These are crucial as they’re located in the original site’s domain and the domain where you are allowed to receive the response. Thanks to this segment, cross-domain requests will work. It’s crucial not to forget this step during the development stages of your AMP pages.
Do I need to implement it? What is SEO’s problem with AMP
Do I need to implement AMP on my site? To answer this question, we recommend you to analyze the traffic of your site. If more than half of the users come from mobile devices, then AMP implementation is worth considering for sure.

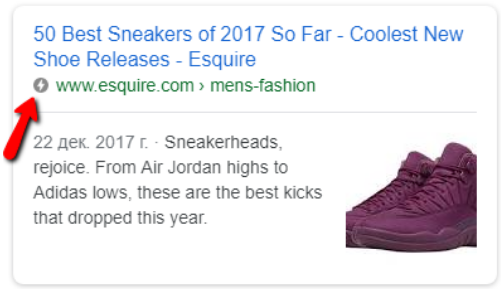
So, what is the issue with SEO? On the left side of this picture you can see the search results page with an AMP sign. If we click on its link, we’ll see a page like one on the right. It’s an AMP page that was instantly loaded from the Google cache in a special iframe. Pay attention to its URL – it’s a Google URL. It means we did not visit our original site, and our mobile traffic was driven to a Google cache URL.
To visit our original site we need to click on the chain sign under the browser line or on one of the internal links, for example, on the menu or logo of the site.
So, on the one hand if the user does not proceed further, Google steals mobile traffic, but on the other hand, with the help of AMP your site is shown at the top of search results. What can we do with this problem?
We just need to wait! Google understands that this is not very fair to steal the traffic and promised to fix the URL issue this year. And instead of a Google URL, the original URL will be shown. Anyway, other advantages of AMP in terms of SEO make it worth considering.
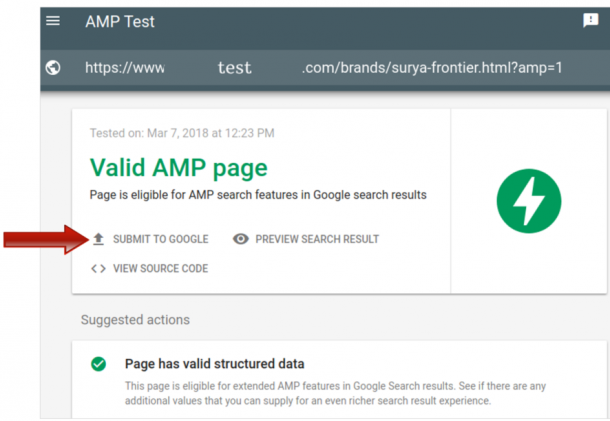
How to submit AMP pages to Google?
Well, if you’re up for it let’s delve into the technical details and key features of the implementation. The first thing we are going to figure out is how to let Googlebot know that we have an AMP version.
To do this, add the <link> tag with AMP HTML attribute to the original (for example, desktop) page version and insert the URL pointing to the AMP page version into this tag.
And on the AMP version add the same tag in order to set the canonical URL pointing to the desktop page version.
<code> <link rel="amphtml" </code> <code> href="https://www.example.com/url/to/amp/document.html"></code>
And this tag to the AMP page:
<link rel="canonical" href="https://www.example.com/url/to/full/document.html">
After doing so, this will make Googlebot crawl not only the main page, but also its AMP version, and if it’s valid, to index, cache, and mark it with a special lightning sign ⚡ on the search results page. This will indicate that your site has both AMP and non-AMP versions of a page, and the users can see two different URLs.
The bare minimum you need to make your page AMP-valid
- Begin with the document type <! Doctype html>.
- Add the <html ⚡> top level tag (also use <html amp>).
- Add the <head> and <body> tags (optional in HTML markup).
- Add the <link rel = “canonical” href = “SOME_URL”> tag inside the header, which points to the usual HTML version of the HTML AMP document or to the source document itself, if that version does not exist.
- Add the <meta charset = “utf-8”> tag as the first child of the header tag.
- Keep the tag <meta name = “viewport” content = “width = device-width, minimum-scale = 1”> in the title tag. It is also recommended to include the value initial-scale = 1.
- Add the tag that points and loads the AMP JS library as the last header element.
Add the following code in the <head> tag:
<style amp-boilerplate>
body {-webkit-animation: -amp-start 8s steps (1, end) 0s 1 normal both; -moz-animation: -amp-start 8s steps ( 1, end) 0s 1 normal both; -ms-animation: -amp-start 8s steps (1, end) 0s 1 normal both; animation: -amp-start 8s steps (1, end) 0s 1 normal both} @ - webkit-keyframes -amp-start {from {visibility: hidden} to {visibility: visible}} @ -moz-keyframes -amp-start {from {visibility: hidden} to {visibility: visible}} @ - ms-keyframes - amp-start {from {visibility: hidden} to {visibility: visible}} @ - o-keyframes -amp-start {from {visibility: hidden} to {visibility: visible}} @ keyframes -amp-start {from {visibility : hidden} to {visibility: visible}} </ style> <noscript> <style amp-boilerplate> body {-webkit-animation: none; -moz-animation: none; -ms-animation: none; animation: none}
</ style> </ noscript>
Do I need to create AMP versions of all my pages on Magento?
The quick answer, no, you don’t need to make AMP versions of ALL the pages in your store. It makes sense to implement AMP on static pages, where content doesn’t change according to user actions, and which are shown on the Google search result page.
For example, there is no point in creating AMP versions of the Checkout or Cart page, because they are not usually used for SEO purposes and contain a lot of custom JavaScript, which is prohibited by AMP standards.
We recommend to have AMP-versions of the following Magento pages:
- all types of Product pages
- categories
- search result pages
- CMS pages
If you haven’t customized these pages a lot they are rather static, and are good candidates for a bit of AMP. Changes such as price calculation, or interaction with the customer can be easily implemented through JS-libraries and AMP components.
How to create both main and AMP-versions of your site’s page?
Now, to create both main and AMP-versions of your site’s page, you need to assign two different URLs to it. You can either create your own route for the AMP-version in Magento, or add a get-parameter ?amp=1 to the URL, and Google will see it as a new page.
We prefer to add an ?amp=1 parameter, because it’s much easier and faster.
How to create Magento AMP compliant pages via module
Let’s take module development as an example of how we can create Magento AMP pages.
To create AMP versions of pages, we need to replace the standard templates with our own which don’t contain prohibited tags, attributes, etc. We need to add an event “layout_load_before” and add our own observer, in which we’ll add our own layouts for certain pages (products, categories, search result pages etc.) The Magento admin panel allows you to add a feature by choosing which of the AMP page versions it’s created for.
To do so, open etc/frontend/events.xml and add
<config xmlns:xsi="http://www.w3.org/2001/XMLSchema-instance" xsi:noNamespaceSchemaLocation="urn:magento:framework:Event/etc/events.xsd">
    <event name="layout_load_before">
 <observer name=“amp_layout_load_before"
 instance="MyModule\Amp\Observer\AddCustomLayoutLoadBefore"/>
    </event>
</config>
Then open MyModule\Amp\Observer\AddCustomLayoutLoadBefore.php and add something like this:
<?php
class AddCustomLayoutLoadBefore implements ObserverInterface
{
	public  function execute(MagentoFrameworkEventObserver $observer)
	{
		$update = $observer->getEvent()->getLayout()->getUpdate();
		/* check GET param ?amp=1 */
		if ($this->cusomHelper->isAmpRequest())
		{
			foreach($update->getHandles() as $handleName)
			{
				$update->addHandle('amp_' . $handleName);
			}
		}
	}
}
OR you can use a plugin instead of events and observers.
In your module file, open etc/frontend/di.xml and add the following:
<type name="Magento\Framework\View\Result\Page">
       <plugin name="amp-layout-handles"
                    type="MyModule\Amp\Plugin\Handles" sortOrder="10"/>
</type>
Then create file MyModule/Amp/Plugin/Handles.php and add the following method:
public function afterAddPageLayoutHandles(Page $subject)
{
      /*check if url has GET pagam ?amp=1 */
      if ($this->_dataHelper->isAmpRequest()) {

                       foreach ($subject->getHandles() as $handleName) {

			/* add own handels to layout */
            $subject->addHandle('amp_' . $handleName);
  }
      }
      return $subject;
}
After this, your layout structure (MyModule/Amp/view/frontend/layout) will be similar to the one below:
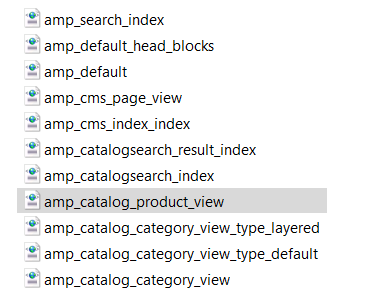
If we open, for example, amp_catalog_product_view.xml file, we will see something like this:
<body>
   <referenceBlock name="head.additional">
      <referenceBlock name="ampcss">
         <block class="MyModule\Amp\Block\Page\Head\Style" name="ampcss.product.style" as="ampcss.product.style" template="MyModule_Amp::head/style/css/product.phtml" />
      </referenceBlock>
      <referenceBlock name="ampjs">
         <action method="addJs">
            <argument name="src" xsi:type="string">https://cdn.ampproject.org/v0/amp-form-0.1.js</argument>
            <argument name="type" xsi:type="string">amp-form</argument>
         </action>
      </referenceBlock>
   </referenceBlock>
   <referenceContainer name="amp.content">
      <container name="amp.items.block" htmlTag="div" htmlClass="amp-product-blocks" after="-">
         <referenceBlock name="catalog.product.related" remove="true" />
         <block class="Magento\Catalog\Block\Product\ProductList\Related" name="amp.product.related" template="MyModule_Amp::catalog/product/list/items.phtml">
            <arguments>
               <argument name="type" xsi:type="string">related</argument>
            </arguments>
         </block>
         <block class="Magento\Catalog\Block\Product\ProductList\Upsell" name="amp.product.upsell" template="MyModule_Amp::catalog/product/list/items.phtml">
            <arguments>
               <argument name="type" xsi:type="string">upsell</argument>
            </arguments>
         </block>
      </container>
   </referenceContainer>
</body>
As you can see, we can use default Magento core Blocks (Magento\Catalog\Block\Product\ProductList\Related), but set our own templates (MyModule_Amp::catalog/product/list/items.phtml), that meet the requirements of AMP pages. In this way we create separate AMP pages for Magento with a simplified HTML structure.
AMP components
The most interesting thing about AMP is the variety of components. At the time of this posting, there are at least 100 of them, and more and more are constantly being added. If used properly, components can cover 90% of the site functionality requirements.
The AMP HTML library provides components that are classified into the following groups:
- The first group is Built-in. These are the components not requiring additional AMP library enabling. They are already included in the default v0 amp-js-library. For example, such components as amp-img or amp-pixel.
- The second group is Extended. To make these components work, you have to enable special AMP JS libraries named after the component tag. For example, amp-audio and amp-form.
- And the third group is Experimental. These are components that are released, but not yet ready for wide use. Such components were not thoroughly tested and may not work as expected. Their detailed list can be found on the site of ampproject.
These components, as well as those to come, are constantly being added to cover as much functionality as possible. If you can’t find the required component, you can try to develop and contribute a component to AMProject via pull request. AMPProject provides special instructions for Contributors.
Let’s look at the components that we used in our project
-
- <amp-form> component. If there is a form somewhere in your templates, you need to include an amp-form-0.1.js library
<action method = "addJs">
          <argument name = "src" xsi:type = "string">
                   https://cdn.ampproject.org/v0/amp-form-0.1.js
           </argument>
          <argument name = "type" xsi:type = "string">amp-form</argument>
</action>
If this JS library is missing in your form, it will cause an error. If there are several forms on your page (adding to cart, search, subscription, etc), you will need to include only one library amp-form-0.1.js to all of them Feel free to find more examples on available AMP form components by following this link:
- <amp-img> component
Images are an essential part of any site’s content – you can’t imagine a product, or a category page without them. As AMP doesn’t allow the use of common <img/> tag for images, you should use the following tag instead:
<amp-img class = "logo"  src = "<?php echo $category->getLogoSrc();  ?>"

                 width = "750" height = "250" alt = "Cool Image">

</amp-img>
It is crucial to indicate an image’s width and height attributes in img-amp so that enough space is allotted while rendering. If these tags, or width/height attributes are missing, it will cause an error and the page will be invalid.
- Talking about images, you may also benefit from <amp-image-lightbox> and <amp-carousel> components. Amp-image-lightbox component is used on product pages for a convenient product gallery overview (you can replace a default Magento gallery with it). The amp-carousel component is an ideal solution for sliders, banners, etc. To make these components work on certain pages, you need to include their JS libraries in your code.
<action method = "addJs">
          <argument name = "src" xsi:type = "string">
                  https://cdn.ampproject.org/v0/amp-image-lightbox-0.1.js
           </argument>
          <argument name = "type" xsi:type = "string">amp-image-lightbox</argument>
</action>

<action method = "addJs">
          <argument name = "src" xsi:type = "string">
                     https://cdn.ampproject.org/v0/amp-carousel-0.1.js
           </argument>
          <argument name = "type" xsi:type = "string">amp-carousel</argument>
</action>
And then you can also use <amp-lightbox> this way:
<amp-img on = "tap:lightbox1" role = "button" src = "/img/Table.jpg"
             alt = "Cool Table" title = "Picture Table view in lightbox"
             layout="responsive"
             width="300" height="246">
</amp-img>

<amp-image-lightbox id = "lightbox1" layout = "nodisplay">
</amp-image-lightbox>
Find more examples of amp-lightbox component usage, click here:
https://ampbyexample.com/components/amp-image-lightbox/
Images carousel will look like this:
<amp-carousel height="300" layout="fixed-height" type="carousel">

     <amp-img src="/img/image1.jpg"   width="400"  height="300"
                       alt="another sample image">
     </amp-img>
     <amp-img src="/img/image2.jpg"   width="400"  height="300"
                        alt="and another sample image">
     </amp-img>

</amp-carousel>
Please, pay attention to the width and height values while using these components.
More carousel examples here: https://ampbyexample.com/components/amp-carousel/
- <amp-iframe> component
One of the most interesting components is the <amp-iframe>. While we already mentioned that you can’t use custom or third-party javascript, CSS files and libraries, if you’re using the “amp-iframe”, you can insert anything, even if it’s not AMP valid.
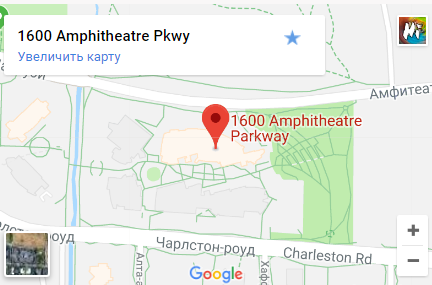
This way your page will contain the required functionality and at the same time will be AMP-valid. On the image you can see that we inserted a Google Map address in the amp-iframe. For example in Magento you can insert in amp-iframe live-chat, custom product options calculation, addresses, store maps and more.
<amp-iframe title="Google mapCA"
      	frameborder="0"  layout="responsive"
     	 width = "600" height = "400"
      	sandbox = "allow-scripts
      	allow-same-origin allow-popups" src= https://www.google.com/maps/embed/v1/place?q=place_id:ChIJ2eUgeAK6ARbn5u_wAGq WA&key=AIzaSyCNCZ0Twm_HFRaZ5i-FuPDYs3rLwm4_848">
</amp-iframe>
- <amp-form> component. If there is a form somewhere in your templates, you need to include an amp-form-0.1.js library
AMP validation
So, let’s imagine that your templates and pages are ready and you are going to deploy them to a production server. Wait a minute! Don’t forget about the last step – AMP validation. How to test your AMP pages to make sure they will be indexed by Google? There are several methods:
- AMP Validator
We like this Chrome browser plugin the most, because it allows to check any page right in Chrome browser, without copying and pasting its URL every time. After plugin installation, you’ll see an AMP sign in the upper right hand corner. If there are AMP errors on your page, this sign will be red and show the number of errors.
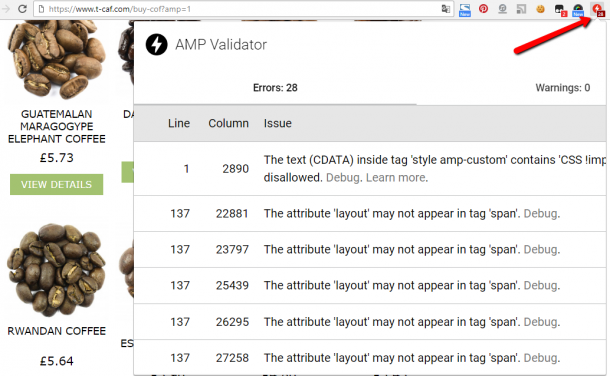
This way you can see the causes of the errors and fix them individually, causing the sign to turn green again when there are no more errors to be reviewed.
-
Official AMP validator is less convenient than a Chrome plugin but it’s still worth attention. The only downside here is the extra (and almost unnecessary) amount of time you’ll have to spend copying each page’s URL over and over again for validation.
-
Google Search Console
When Googlebot indexes your site and gets to an AMP version of a page, it adds information to the Accelerated Mobile Pages section of Google’s Search Console. There you can see all your AMP pages statistics, validation errors, etc. Invalid AMP pages are marked with “AMP pages with critical issues”.

If you fix an error found by Google, you can send another request for indexing. Within several days your page will be re-indexed.
Clearing cache on AMP pages
After all your AMP pages were successfully validated and indexed by Google, they are also cached. If something is changed on your page, for example a product price or description, you need to let Google know that content is outdated and needs re-indexing as described above. To clear the cache on your end, you need to generate an AMP page URL according to the Google AMP requirements.
For example this URL will clear cache for certain product pages:
https://www-sitedomain-com.cdn.ampproject.org/update-cache/c/s/ www.sitedomain.com/stanley-juniper-dell-chest-in-white1.html?amp=1&_action=flush&_ts=1512889699&_url_signature=pwFqaT1BgqESIaKREyeIJP4QYY0ykl6W37YzGs9emEQjkpwY2juBuc7O9njFFqSYTQezoP1RTZiorItOh0Qw14OPAJBqb49AumJAMPKgffcU_Z8d6FQWafOE5WU8VFCk8JpW3s91AdYHbpNliLBERIYLMPpLW7taZywfnF8nd6Pjl7GLKYDSu8ml6DHeEy9E4MtlStVKbEguSswyWwZyK7opmkSq6xevdB_Am9YLfVGmd2SEypf4kPwQ5on5c0kxbv5EIPADrSQz59T9MrhrDFIx4J4ibjYjKrH5wOjxFMVy5k1wN6CETYj9l
We are not going to describe in detail the parameters and components of this URL – because they are well described via this link where you can read more.
What is PWA and how it is related to AMP?
We want to talk a little about Progressive Web Application (PWA for short) and about how it is related to AMP.
AMP and PWA work great together. In addition, Magento announced that in 2018 a new tool for working with PWA (Magento PWA Studio) will be released. This tool set will allow users to create online stores in PWA format.
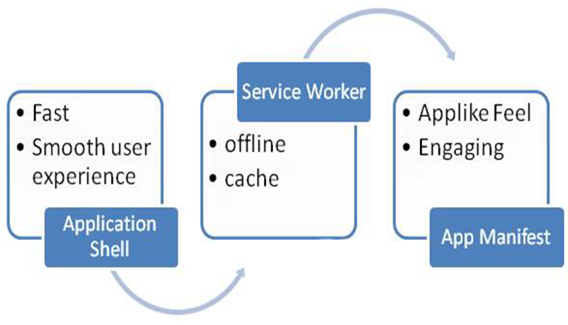
Let’s see just what PWA is. In this picture, you see an approximate PWA structure. The main components are the Application Shell (‘this is the minimum set of HTML, CSS and JavaScript that is required for the user interface), the Service Worker (the javascript working in the background) and the Application Manifest (JSON which contains information about the application, such as name, pages, icons for different resolutions, color screensavers, etc.)
Roughly speaking, you can imagine PWA as a site that is built using web technologies, but it looks and behaves like a real mobile application!
The advantages of PWA and why they are great for online shops:
- they can work on a variety of devices, depending mostly on browser capacity.
- they are safe, because they support only https
- such applications are indexed by Google
- they are self-updating
- they are installed in one click, and there’s no need to search among millions of other applications. If you liked the site – install it and you’re good to go!
- PWA can partially work offline and work great in places with poor Internet connection.
- Using push notifications, it’s easy to return users back to your site and engage them in your promotions and sales
- they are also easily shared by links in social networks that are simple to copy and paste to friends
- and did we mention that they’re super fast?!
How can AMP be combined with PWA?
- Firstly, the site can be both AMP and PWA. AMP pages example can be found on ampbyexample.com. After re-visiting the site from your mobile device, you will be asked to install it as an application. This picture shows a screenshot from a smartphone whereby pressing “accept installation”, an icon appears of the site next to other applications, but when you open it, it will look and feel like an application.
- The second way to interact with it is when the AMP can switch to the PWA. For example, you opened a page from the Google AMP cache, and on this page a special <amp-install-serviceworker> component is added, which will start loading the service worker for PWA. And when you click on an internal link on the AMP page, the PWA shell will already be loaded.
- And the third way to interact is when AMP can be part of PWA as AMP pages can be added to other sites. Some blocks or whole AMP pages can be loaded in special windows inside the Progressive Web Application.

In the end, we want to say that AMP is a relatively new technology, which will be constantly evolving and expanding over the next few years, to cover as many site functionalities as possible. Implementing Magento AMP pages with customization is not a quick task, but the result and loading speed on mobile devices are definitely worth it. And last but not least, it’s a great demonstration of how well AMP and PWA can be used together to create flexible, integrated systems for your E-commerce project.
Hunting for Magento development support?
We’ll be in touch soon if you leave your contact information


