Product Types And Their Creation in Magento 2
Magento core team has re-thought the way products are created in Magento, the product types are still the same ones we’ve come to know and love from Magento 1x:
Magento supports six product types that differ in behavior and attributes. And even though the Magento development team has re-thought the way products are created in Magento, the product types are still the same ones we’ve come to know and love from Magento 1x:
- Simple product
- Grouped product
- Bundle product
- Configurable product
- Virtual product
- Downloadable product
In this article, we are going to walk you through all six product types and provide you with clear instructions on how each type can be to used and created to make your life as easy as possible. Let’s get started.
Simple product
Simple products are items that are available in just one variation, like your grandmother’s secret recipe for pasta sauce. Shoppers cannot select the size or color of such a product, they have to buy it as is. Simple products are things like chairs, chandeliers, or something like this bag:
The process of simple product creation (as well as other product types) isn’t too complicate and can be easily configured by just about anyone, grandma included. Just follow the steps below.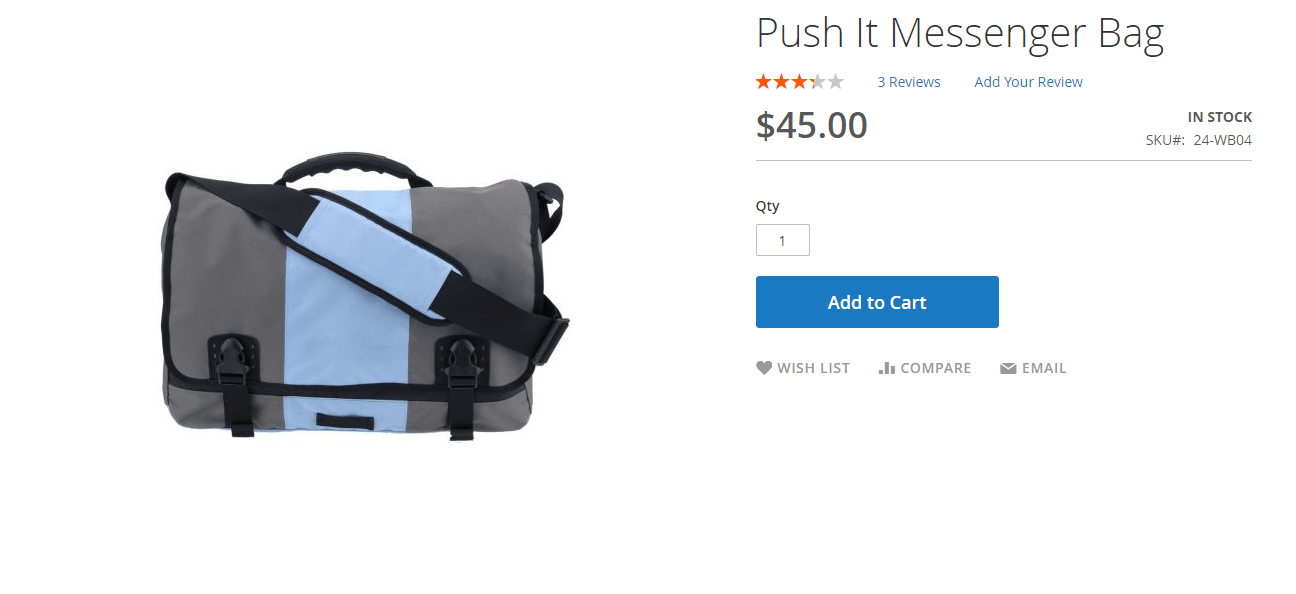
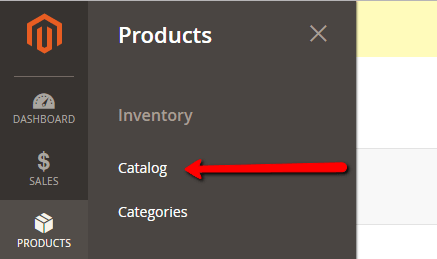
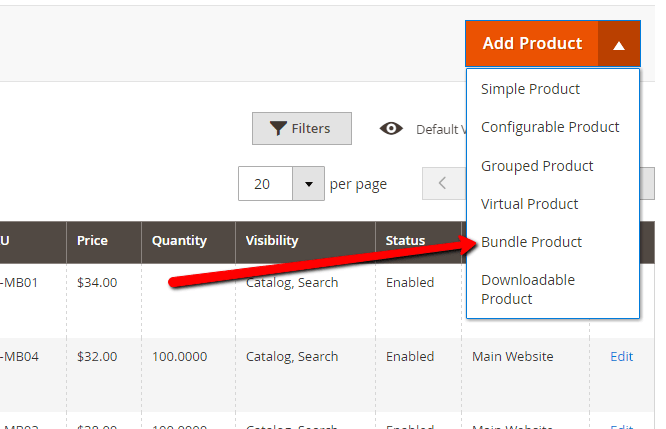
Step 1. Access your Magento 2 admin, and go to Products and then Catalog on the admin panel.
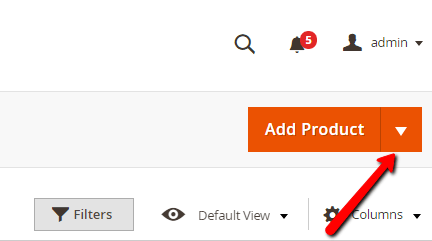
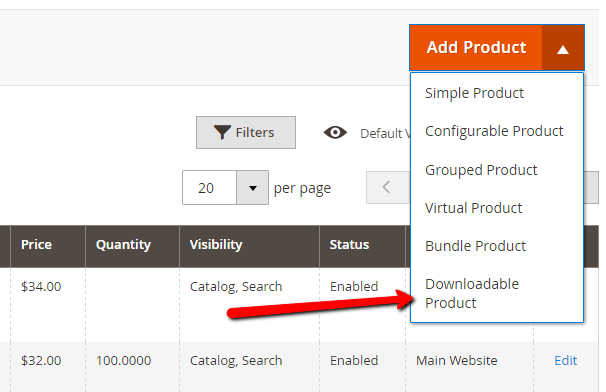
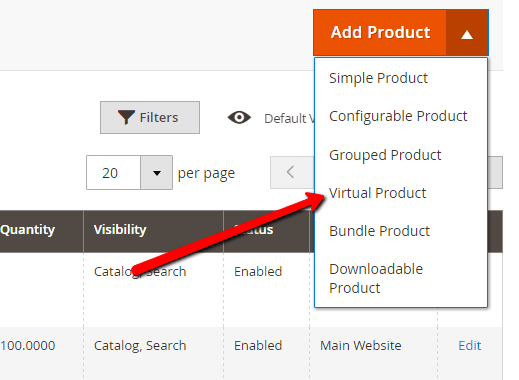
Step 2. Click the down arrow image on the Add Product button.
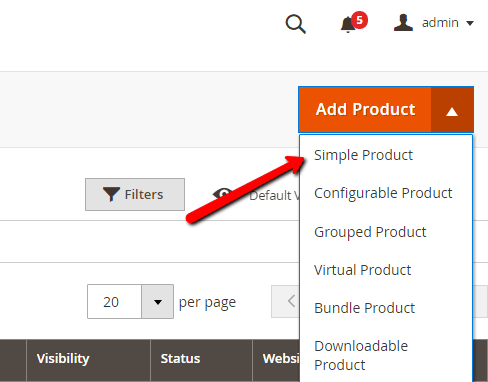
Step 3. In the drop-down menu choose Simple Product.
NOTE:
It’s worth noting that no matter what type of product you’re adding, these first 2 steps will always be the same. The only part that changes is the product type you choose, which makes the process a bit easier. Nifty, right?
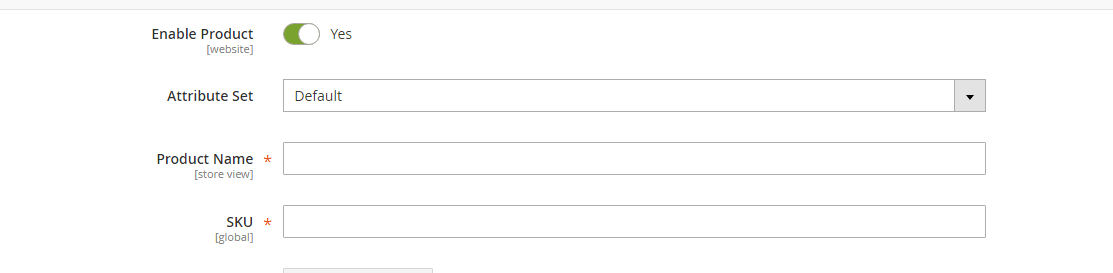
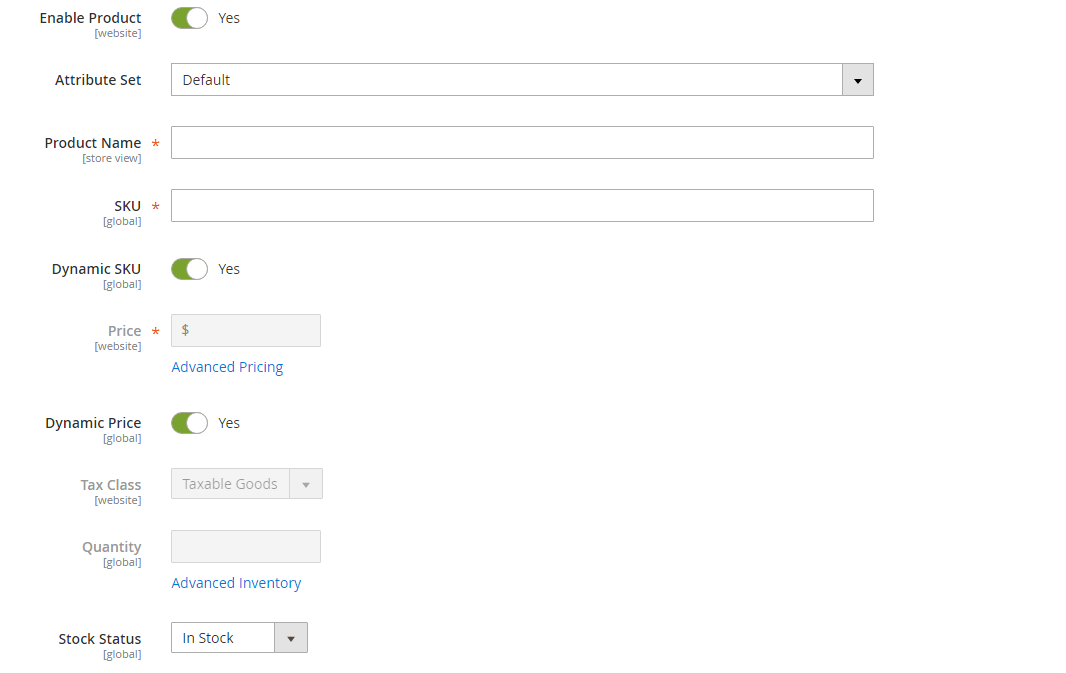
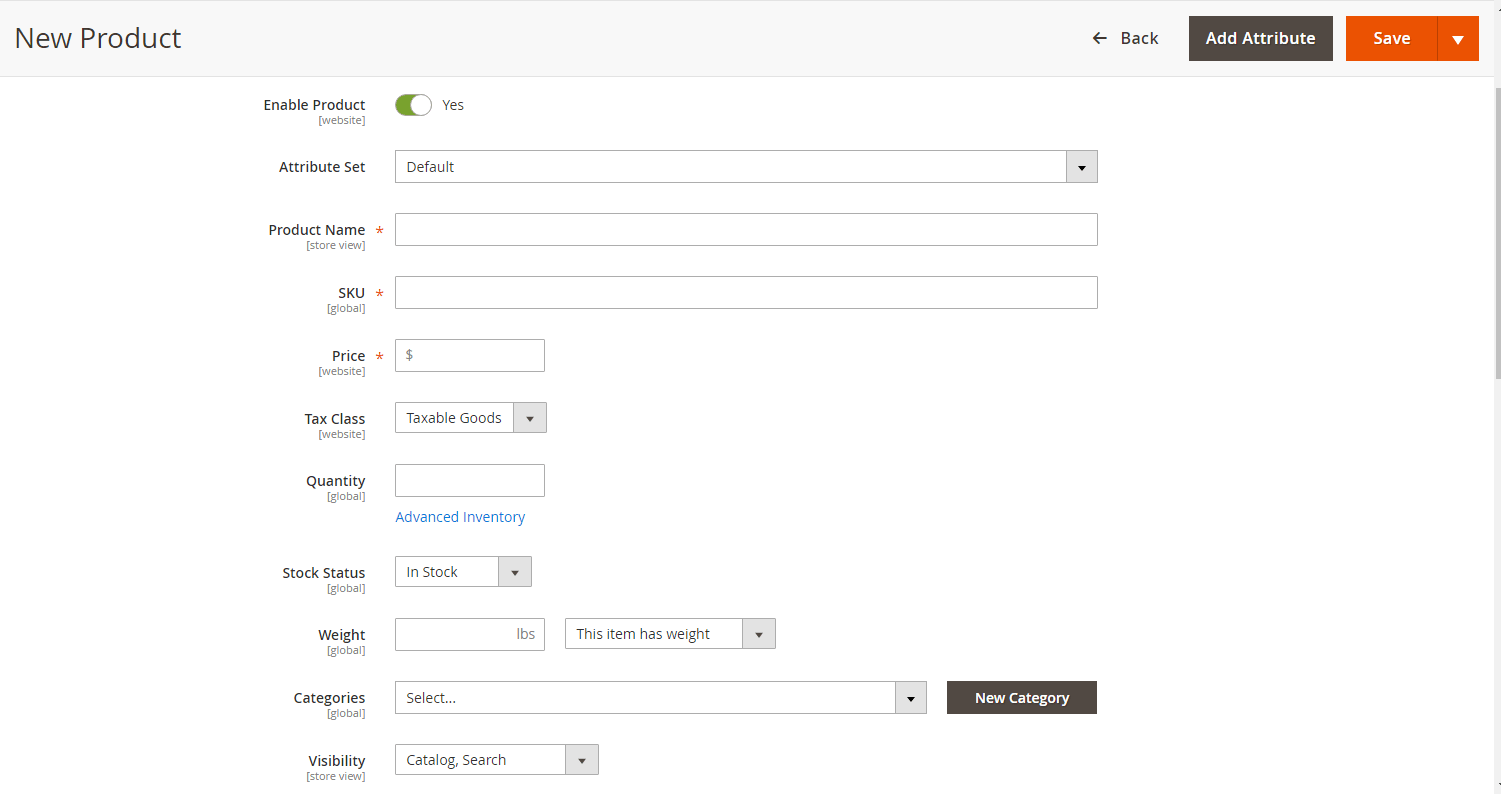
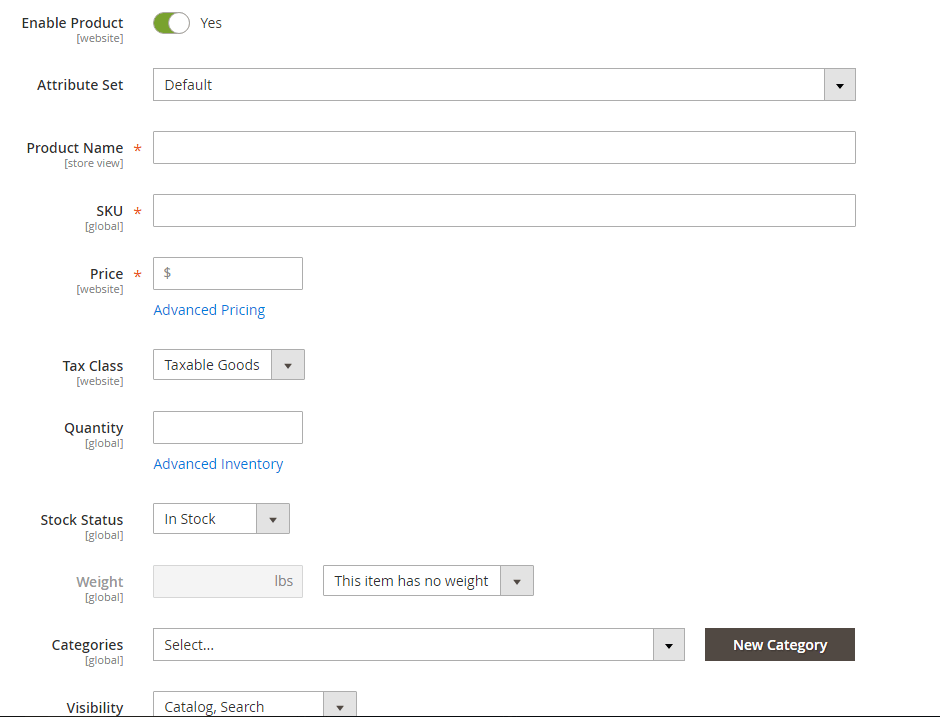
Step 4. Choose an Attribute Set for your product.
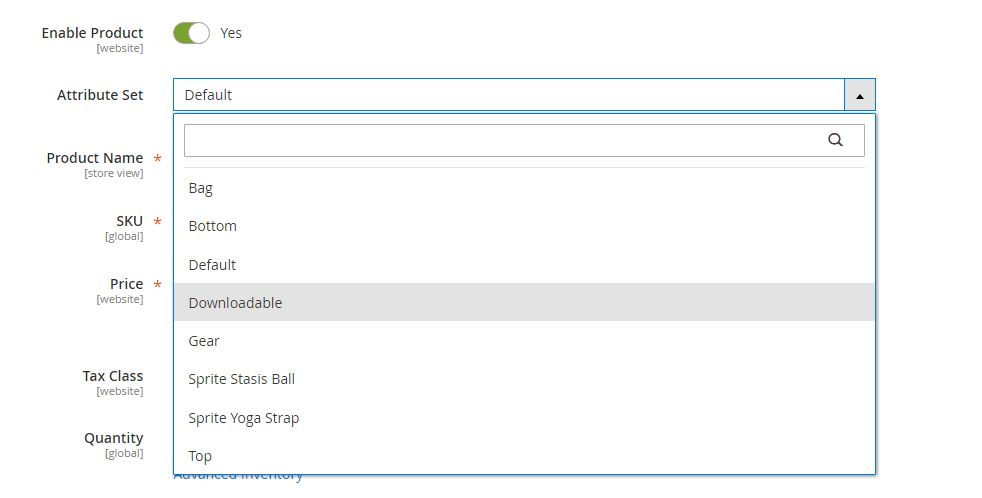
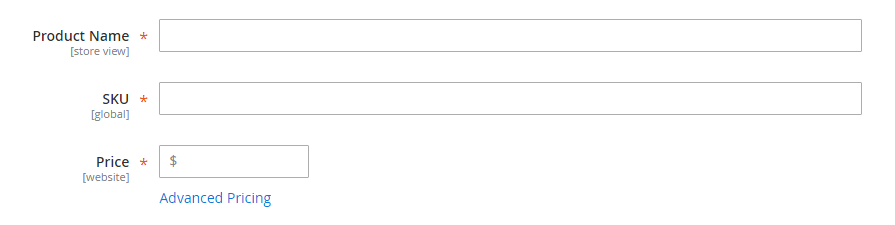
Step 5. Fill in the required fields. There are three required fields for Simple Products: Product Name, SKU (Stock Keeping Unit) and Price. Speaking of SKU, you can either use the default SKU based on the product name, or modify this part to create any name you want.
Step 6. After you’re done with the required fields, you can move on and fill in the other fields to add a more detailed and specific list of your product features. These fields are:
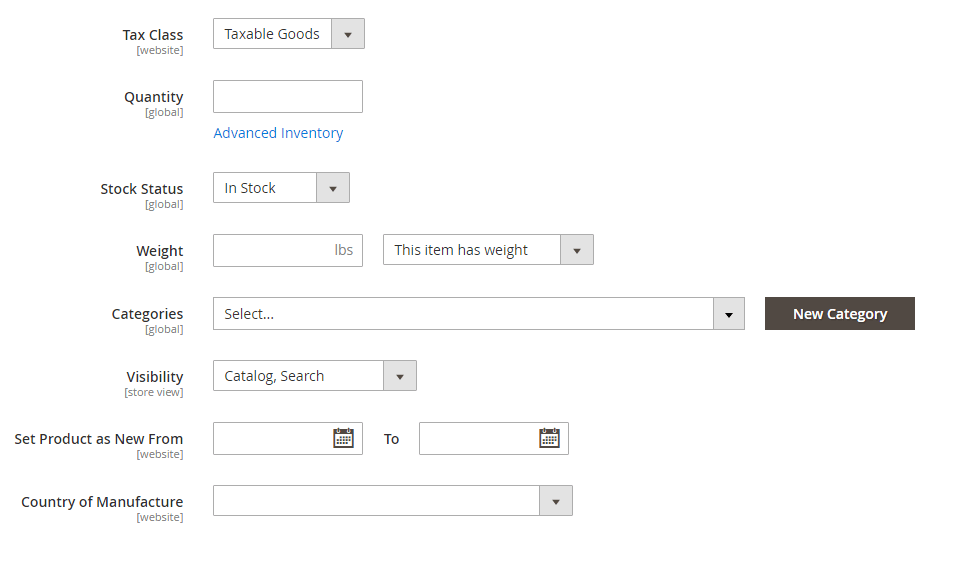
- Tax Class where you can select what taxes should be applied.
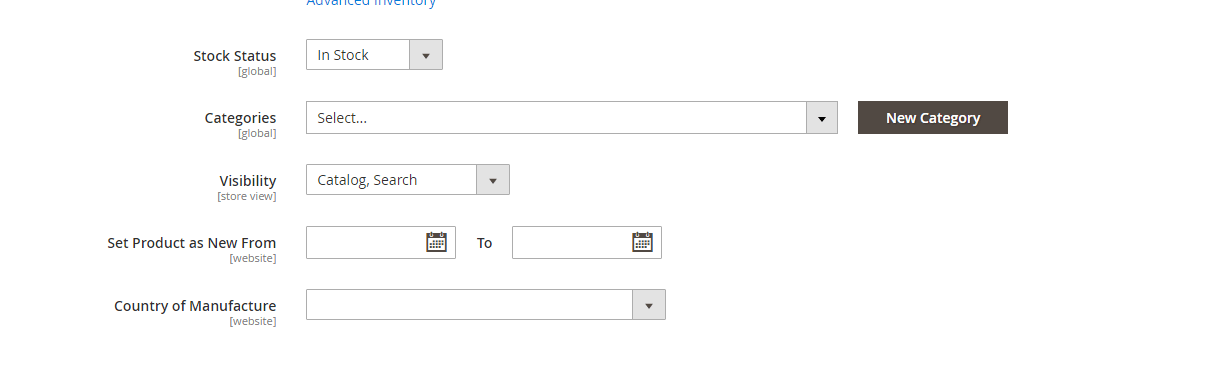
- Stock status has two options available: “In Stock” and “Out of Stock”.
- Weight enables you to enter the product weight if you choose “This item has weight” option. If your product doesn’t have weight, the only thing you need to do is to select “This item has no weight” option that automatically disables weight input field.
- Categories where you assign the product to any of the available categories. And if you can’t find a category you need, it’s super simple to create your own category. You’ll see the “New Category” button on the right side of the drop-down menu.
- Visibility drop-down allows you to choose your product display options: visible in Catalog, Search or in both Catalog and Search results.
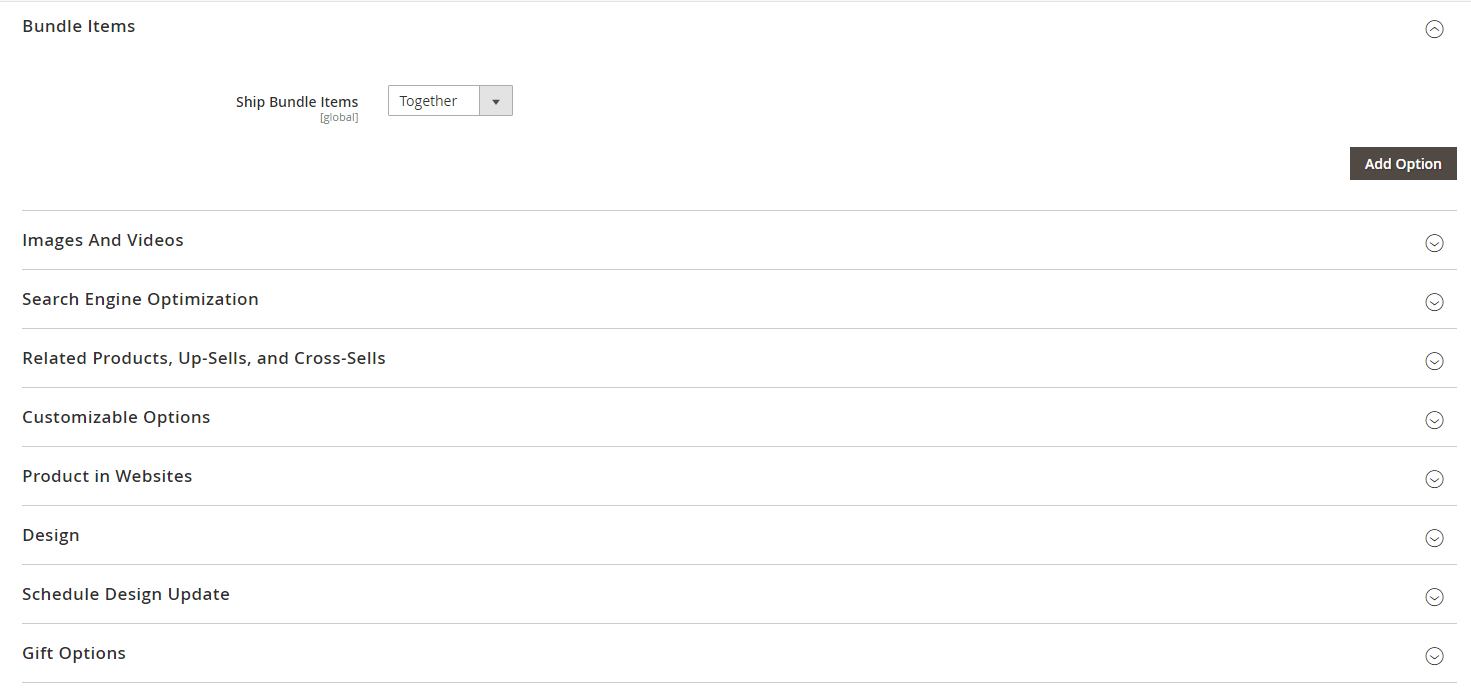
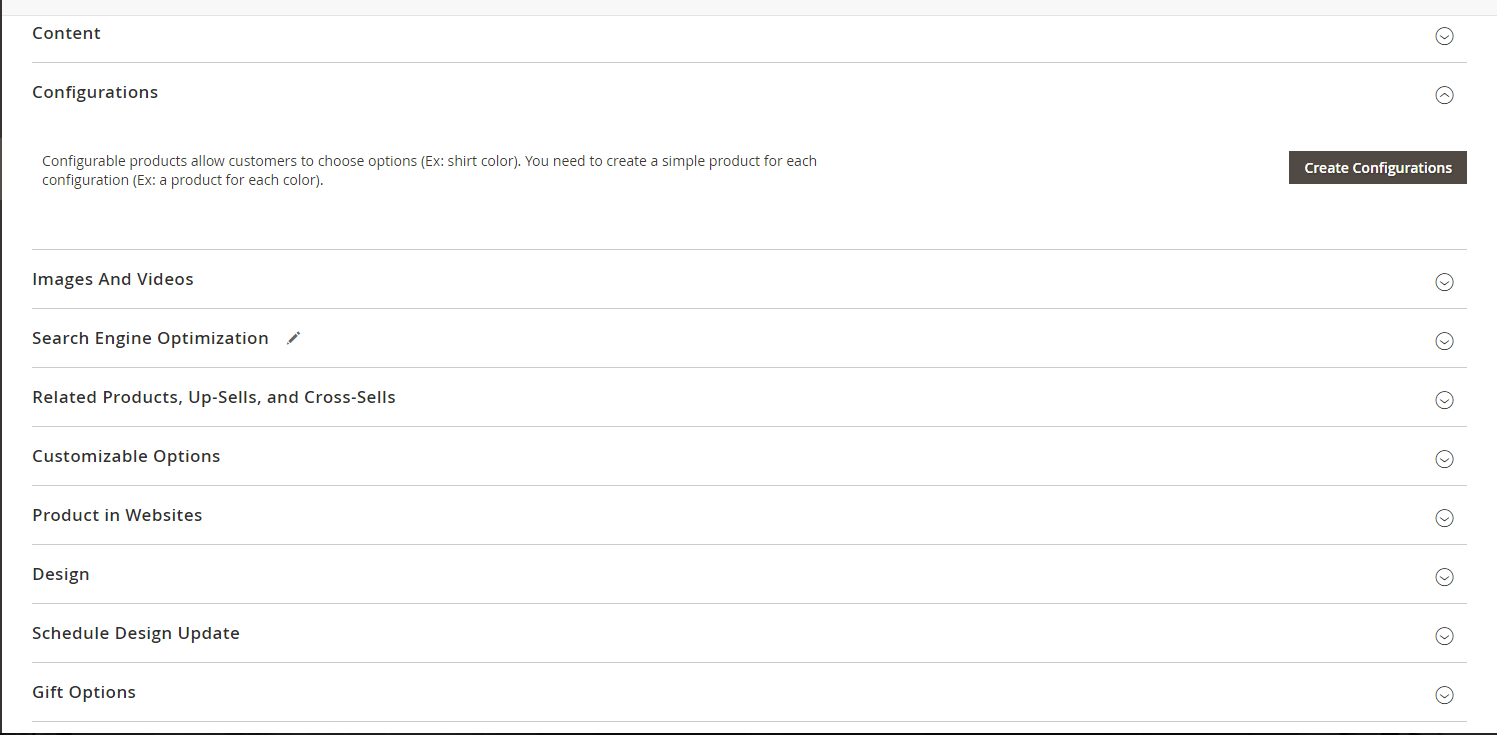
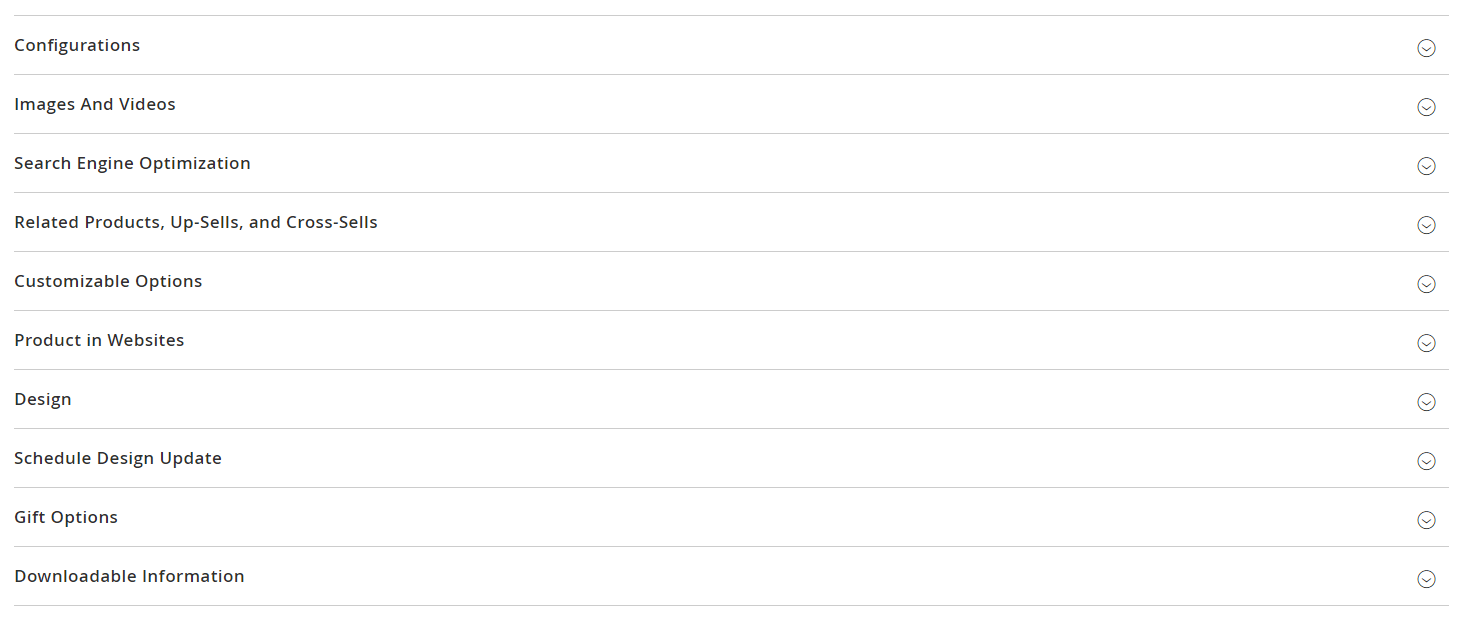
Step 7. After you’ve included all the necessary information about your product, you can add some more details about it in the following sections:
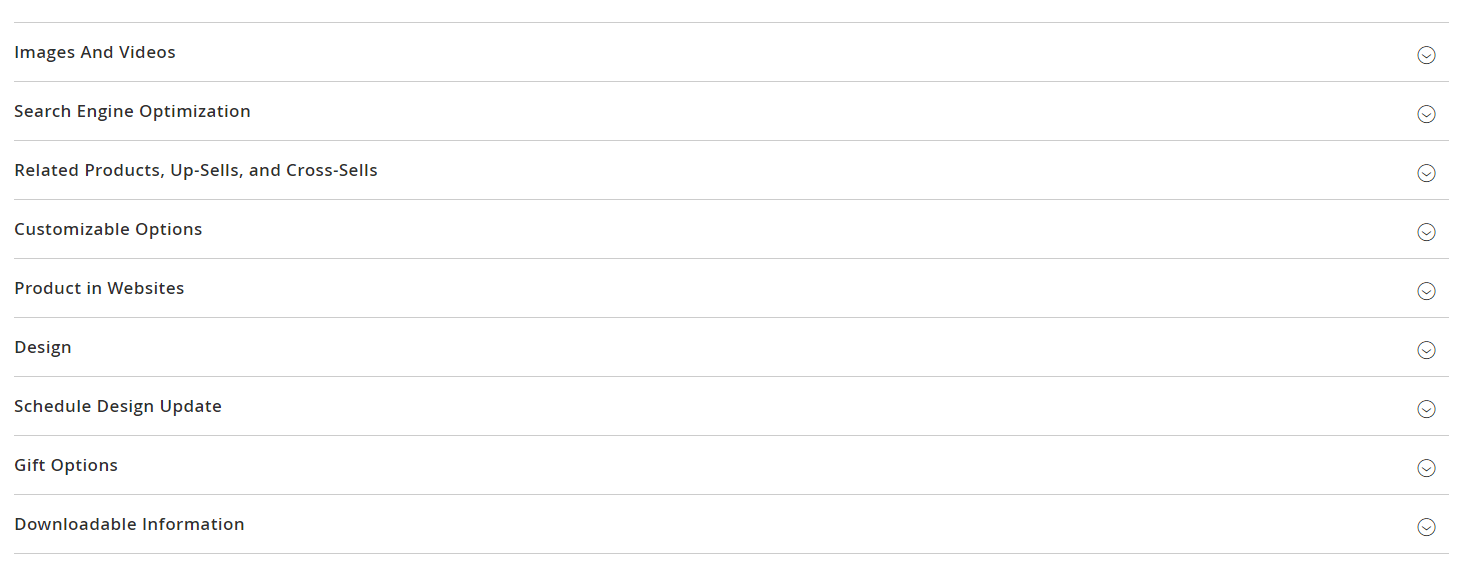
As you see, there’s an opportunity to configure a number of different things like product images and videos, SEO, related products, design, etc. You have freedom to customize your product and the way it appears on your page, giving you greater flexibility in making your store your very own.
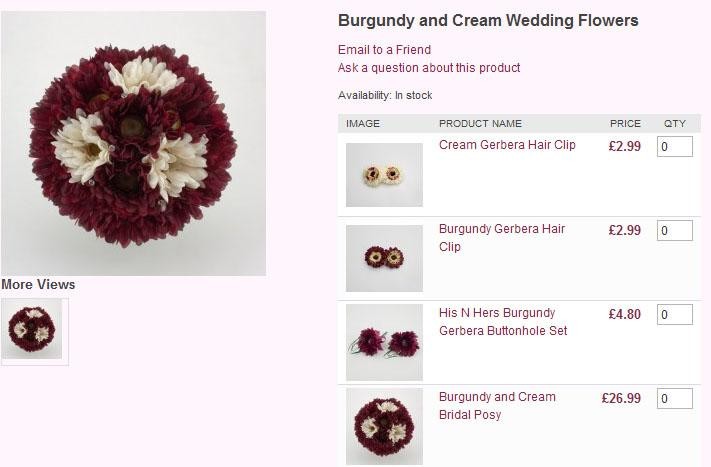
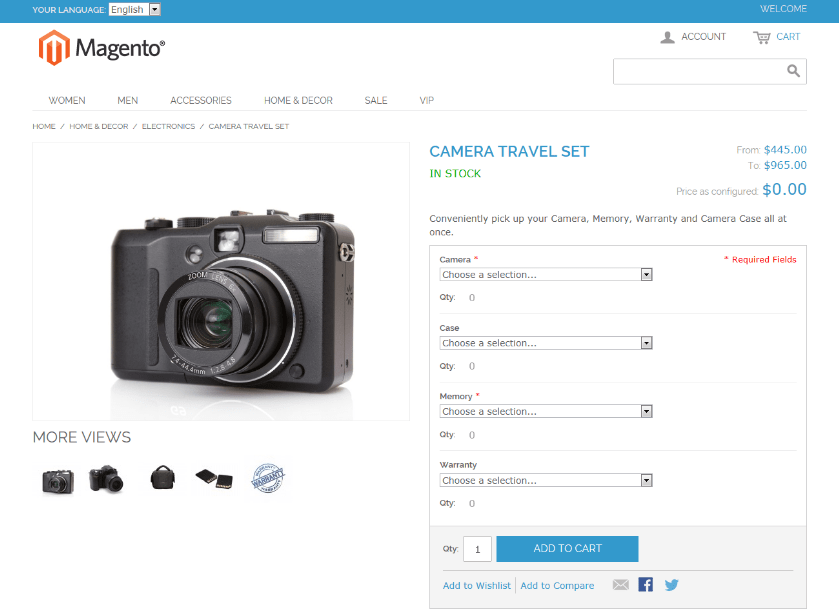
Grouped product
Grouped Product is a set of several simple products displayed on the same page. All these products can be bought either separately, or together as a group. For example, these Burgundy and Cream Wedding Flowers:
So, based on the variation of Simple Products we can create a Grouped Product. Keeping it simple, as you remember from before, the first two steps are the same for all the product types. So starting from there:
Step 3. In the dropdown menu choose “Grouped Product”.

Step 4. And select an attribute set for your product. This step is similar to Simple Product, and is also completely optional.

Step 5. Now, fill-in all the required fields which are exactly the same as the Simple Product required fields.
Step 6. And, just like before, once you’ve finished with the required fields, you can always add more detail to the optional fields. In this case, there are fewer options than the Simple Products page.
Step 7. Complete the product details sections.

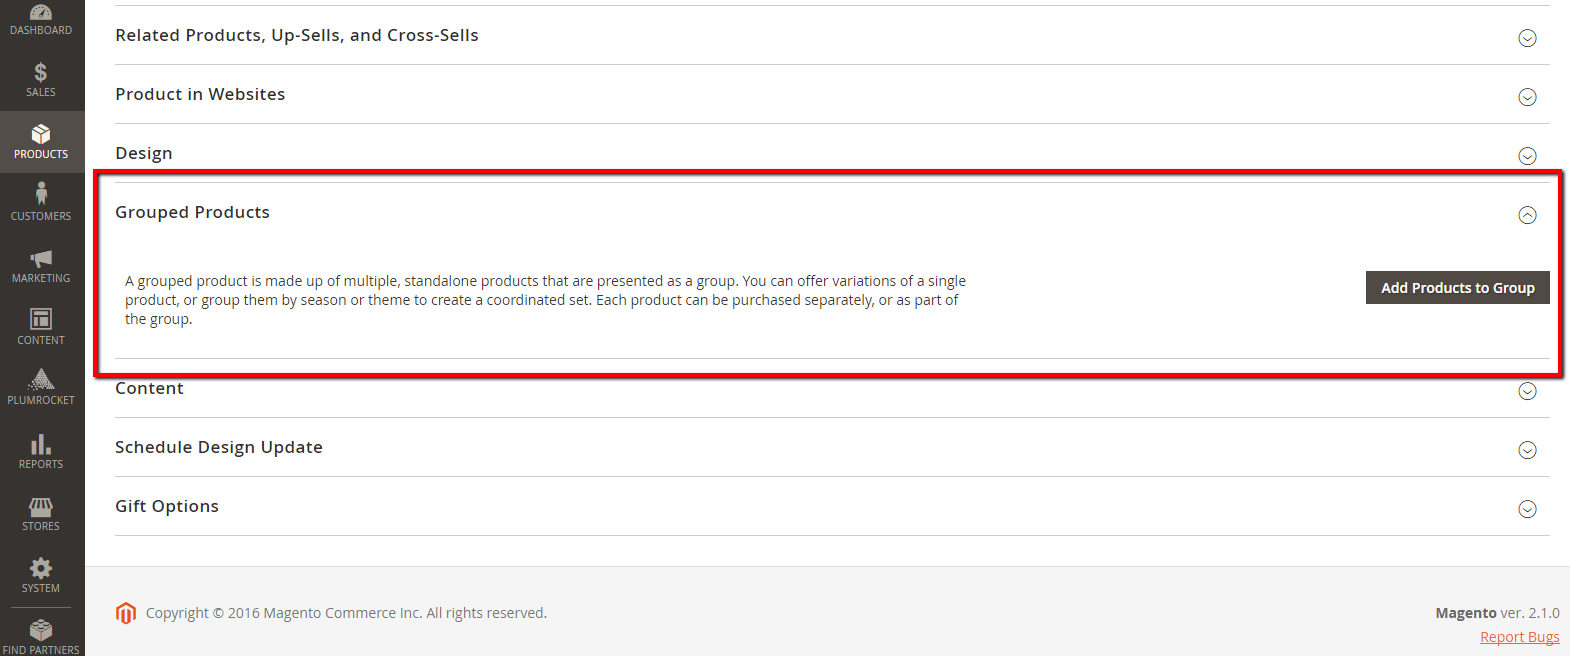
Step 8. Add Grouped Products.
To add products to a group, you’ll find a Grouped Product section at the bottom of the Product Details page:
Click “Add Products to Group” button, then find and add the products you need by filtering them like this.
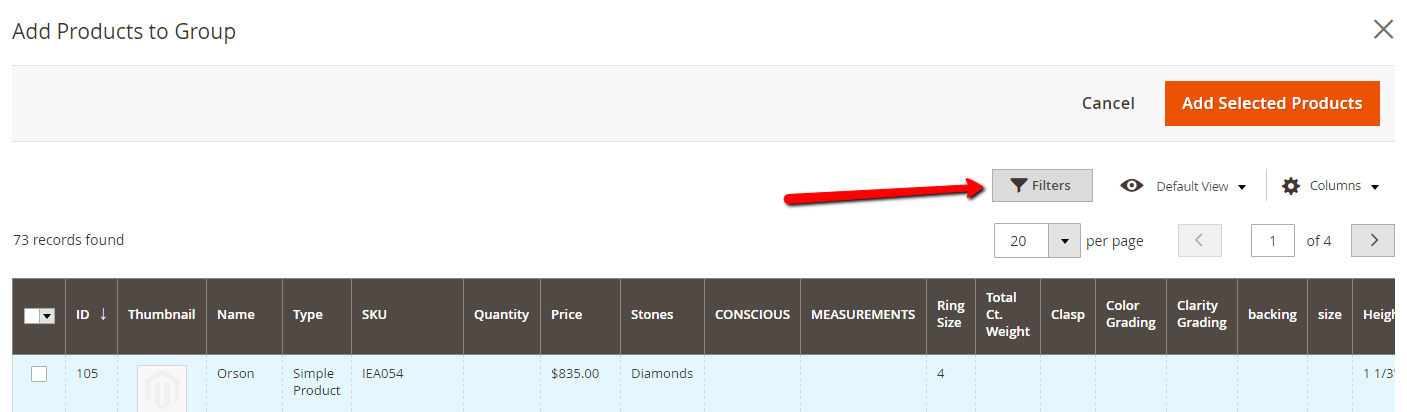
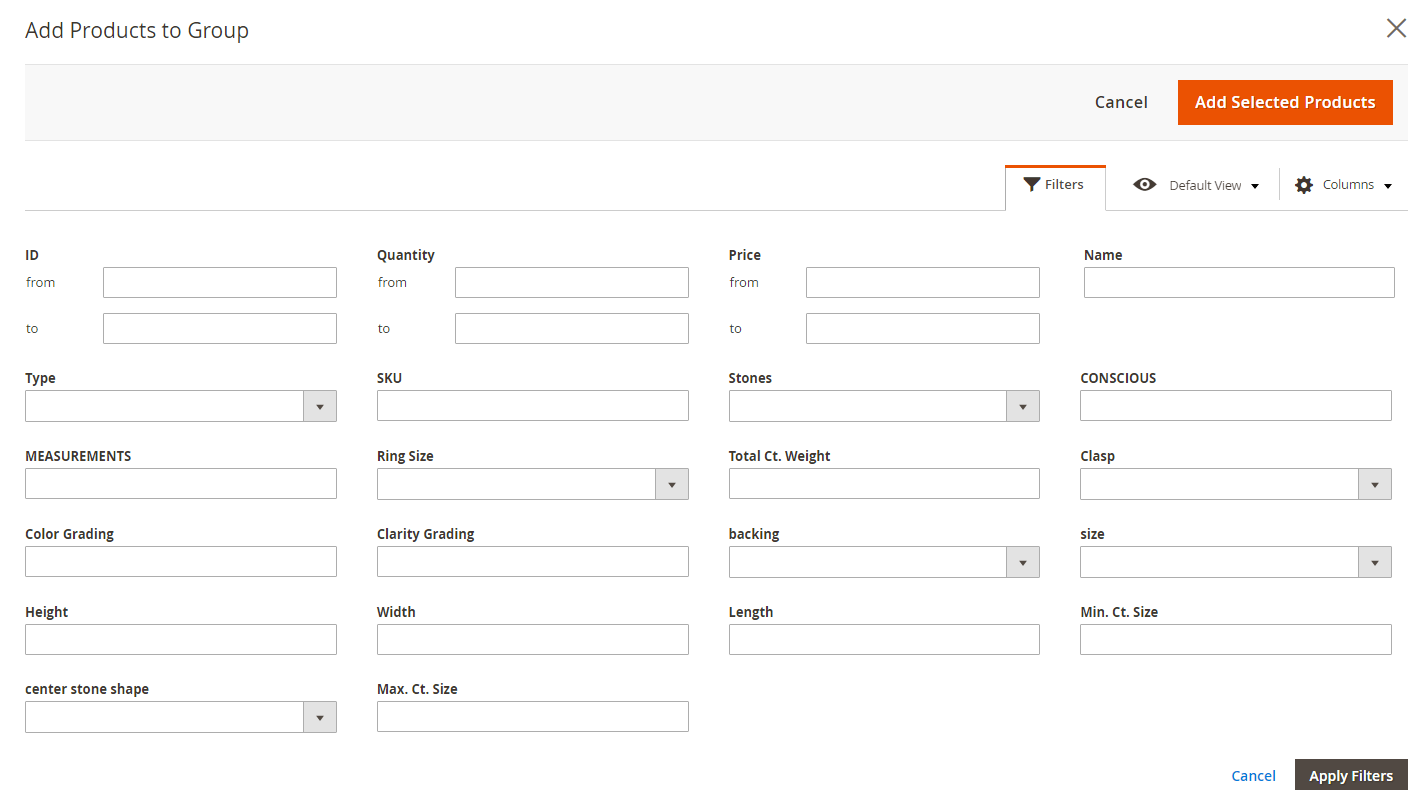
Once you’ve selected all the products you want to add to the group, click “Add Selected Products”.
Step 9. Now, you can configure the Shopping Cart Thumbnails. This step is optional, so you are completely free to skip it, but who doesn’t love actually seeing what they’re about to buy? That’s like buying a car without test driving it! And, if you’d like to set different thumbnail views in the shopping cart, here’s how:
- On the Admin sidebar, choose Stores -> Configuration.
- In the Sales tab, opt Checkout. Expand the Shopping Cart section.
- Grouped Product Image-> Product Thumbnail Itself.
- And click on Save Config to complete.

Voila! Your grouped product is ready to be saved, and we’re almost ready to make it go live!
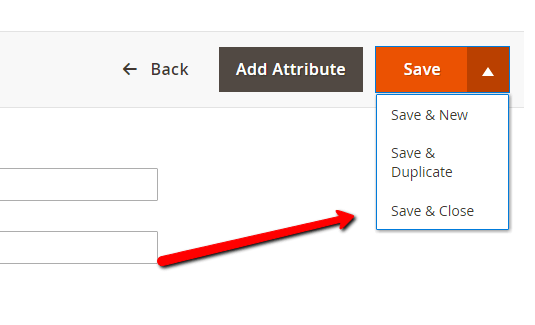
So, Step 10 will be to expand the “Save” drop-down menu and choose “Save & Close”. Now your product is ready to be put on display for the world to see! And, of course, to make you some money.
Bundle product
Bundle Products give customers an opportunity to accessorize their own purchase, choosing from a variety of additional fun add-ons that suit their needs. The bundle could be a beauty kit, computer, or any other product that can be customized. Each item in the “Bundle” is a standalone product, but not all of these products can be sold separately. So, it’s a great chance to let your customers accessorize for themselves.
Should we learn how to create Bundle Products? Yeah, let’s go for it, just follow these steps and you’ll be up and running faster than two shakes of a lamb’s tail!
Step 4. Fill in all the required fields, as normal.
Step 5. Complete all the necessary product details.
Step 6. To add some extra Bundle options, just click the “Add Option” button in the Bundle Items section:

Here you have the ability to set an “Option Title”, basically the menu type that your product will be displayed in, – Drop-down, Radio Buttons, Checkbox, or Multiple Select, and you can decide if this option is a required field or not for your customer.
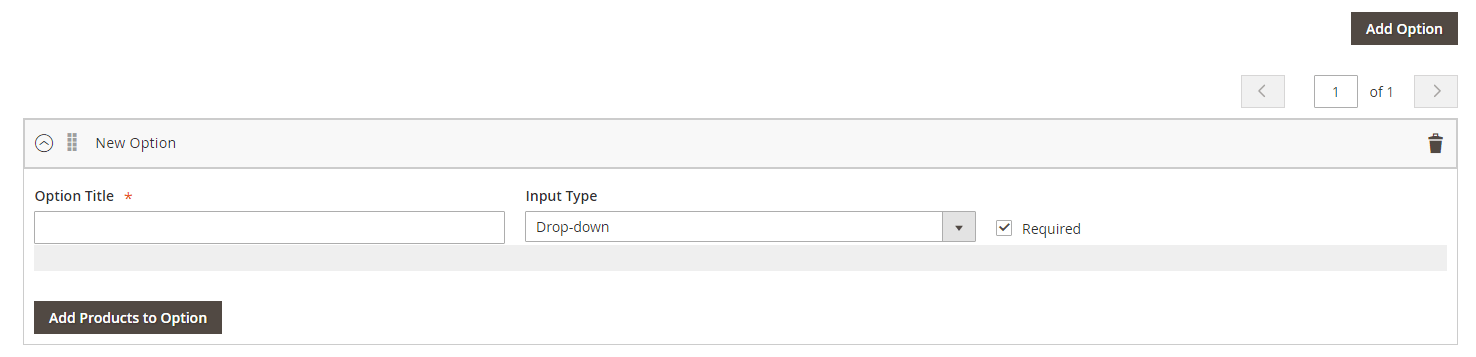
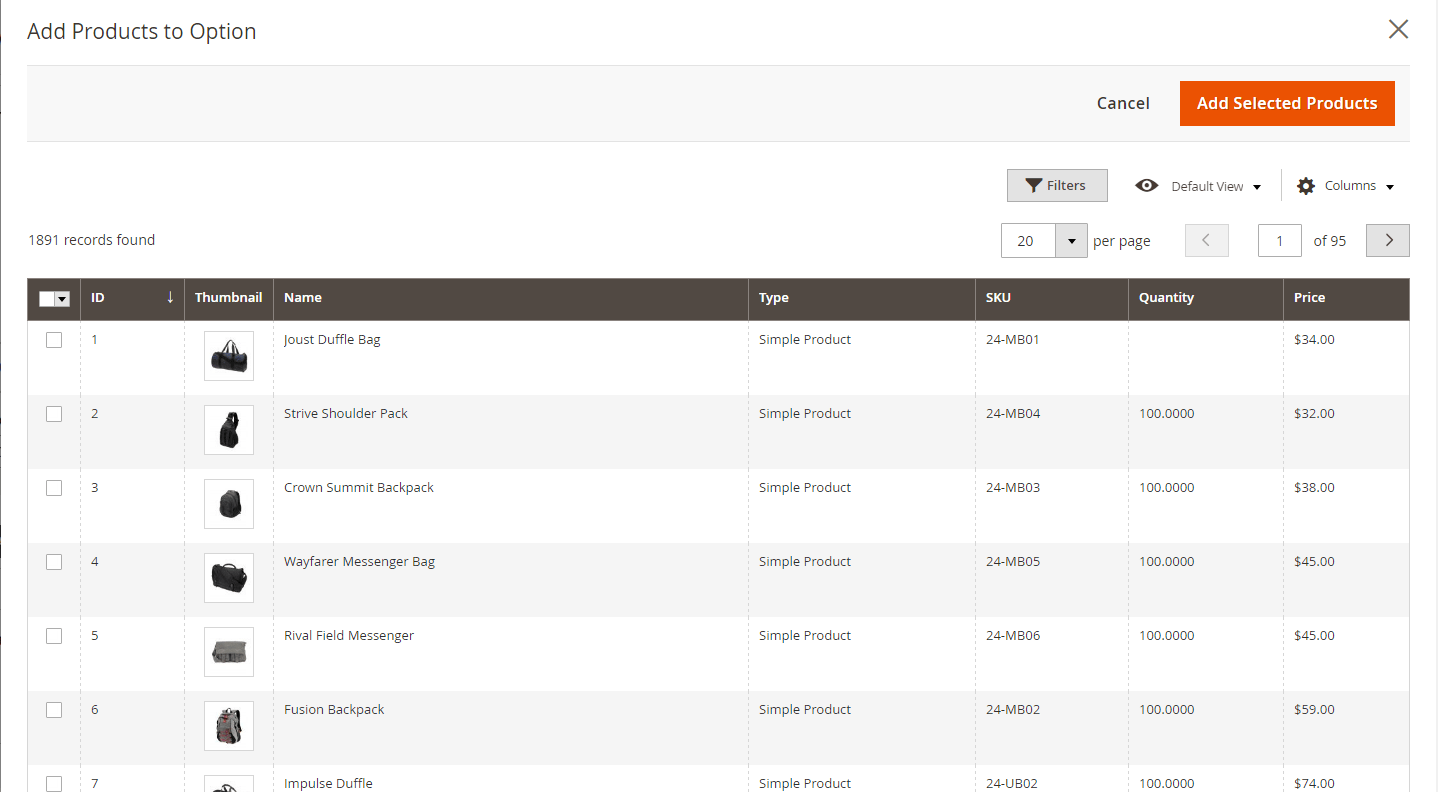
After you’re done with all the settings, click the “Add Products to Option” button where, as the name suggests, you can choose products to be linked with this option. Everything from doorknobs to shoelaces, assuming that’s the kind of stuff in your store. When you’re ready, click the “Add Selected Products” button.
And that’s it, you can then generate and publish the product by choosing the “Save & Close” option in the “Save” drop-down menu, just like last time.
Configurable Product
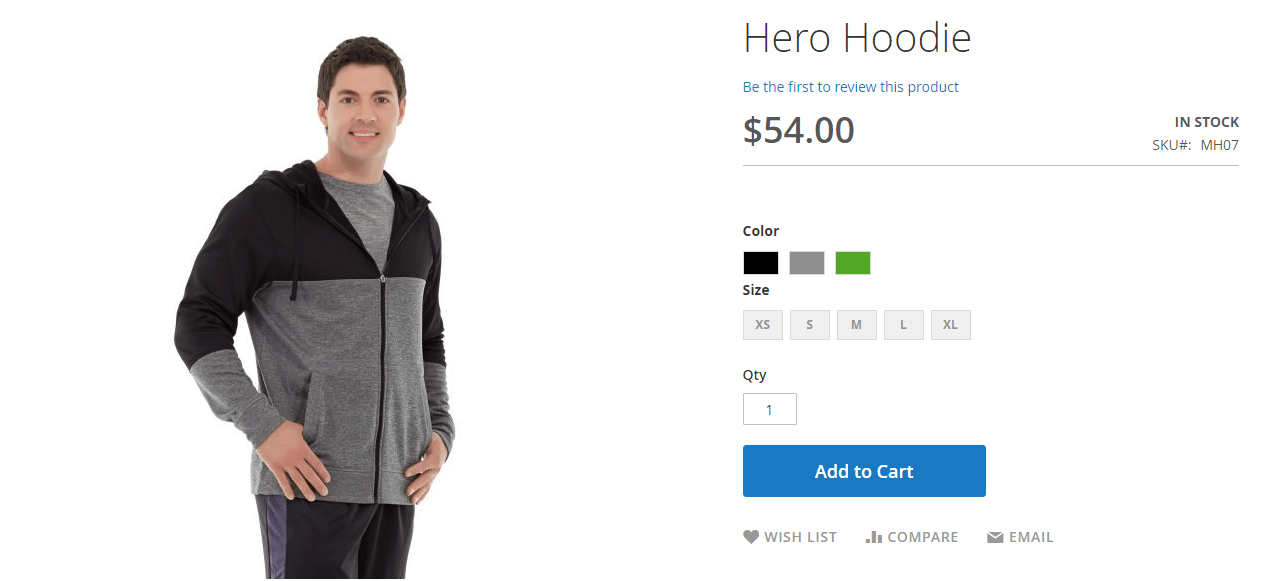
Configurable Products are actually a single product, with sets of options you can choose from. Each option in this set is represented by a simple product with an individual SKU though, giving an opportunity to track inventory for each variation. Here’s a perfect example, choosing a hoodie! Need a certain size? Color? Here’s where the configurable part comes in.
So, to get cracking with the implementation, we’ll start with step number 3.
Step 3. Click the “Add Product” dropdown to choose Configurable Product.

Step 4. Fill in all the required fields as well as additional ones in case you need them.

Step 5. Complete all the Product Details.
Step 6. And now, for the juicy part: adding Configurations. This is where you’re able to configure multiple colors and sizes for your Configurable Products.
First thing you have to do is to click here: Create Configurations.

Then you’ll see this page with four steps to follow:
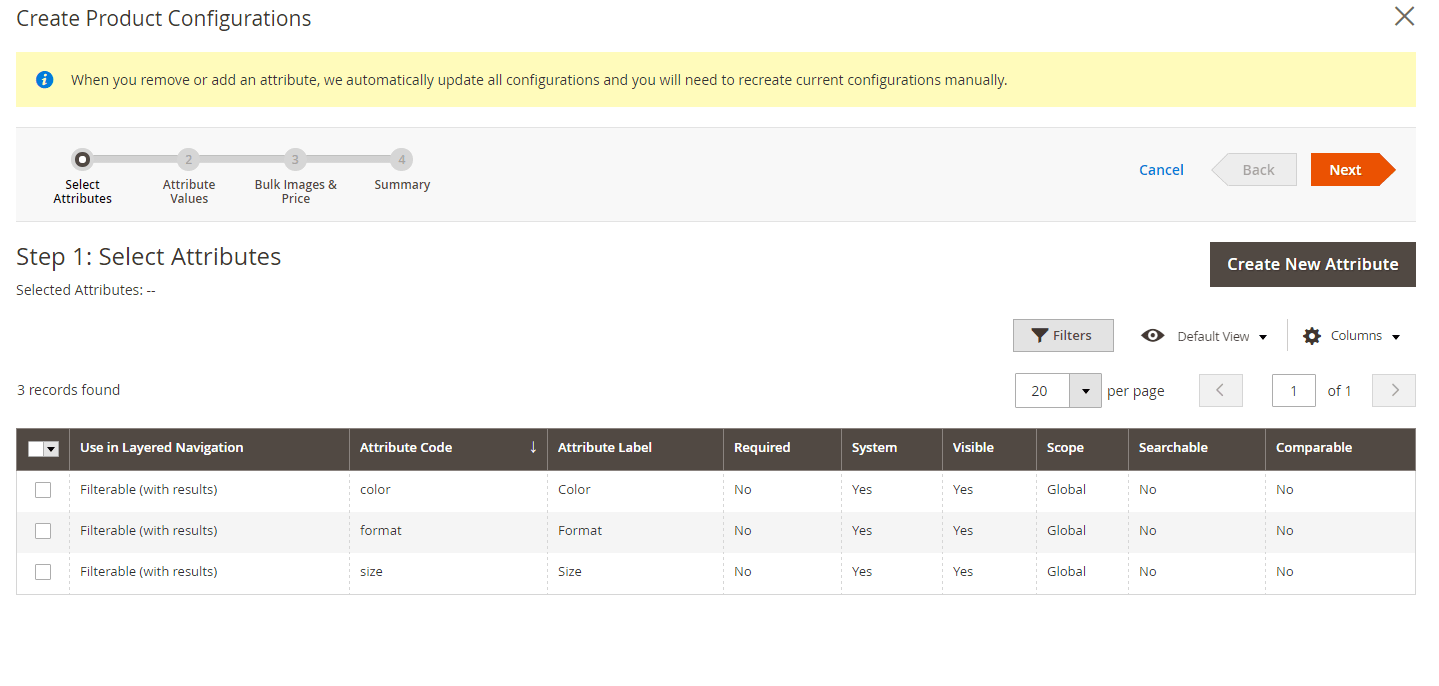
Select the attributes you’ like to configure and click the “Next” arrow button.
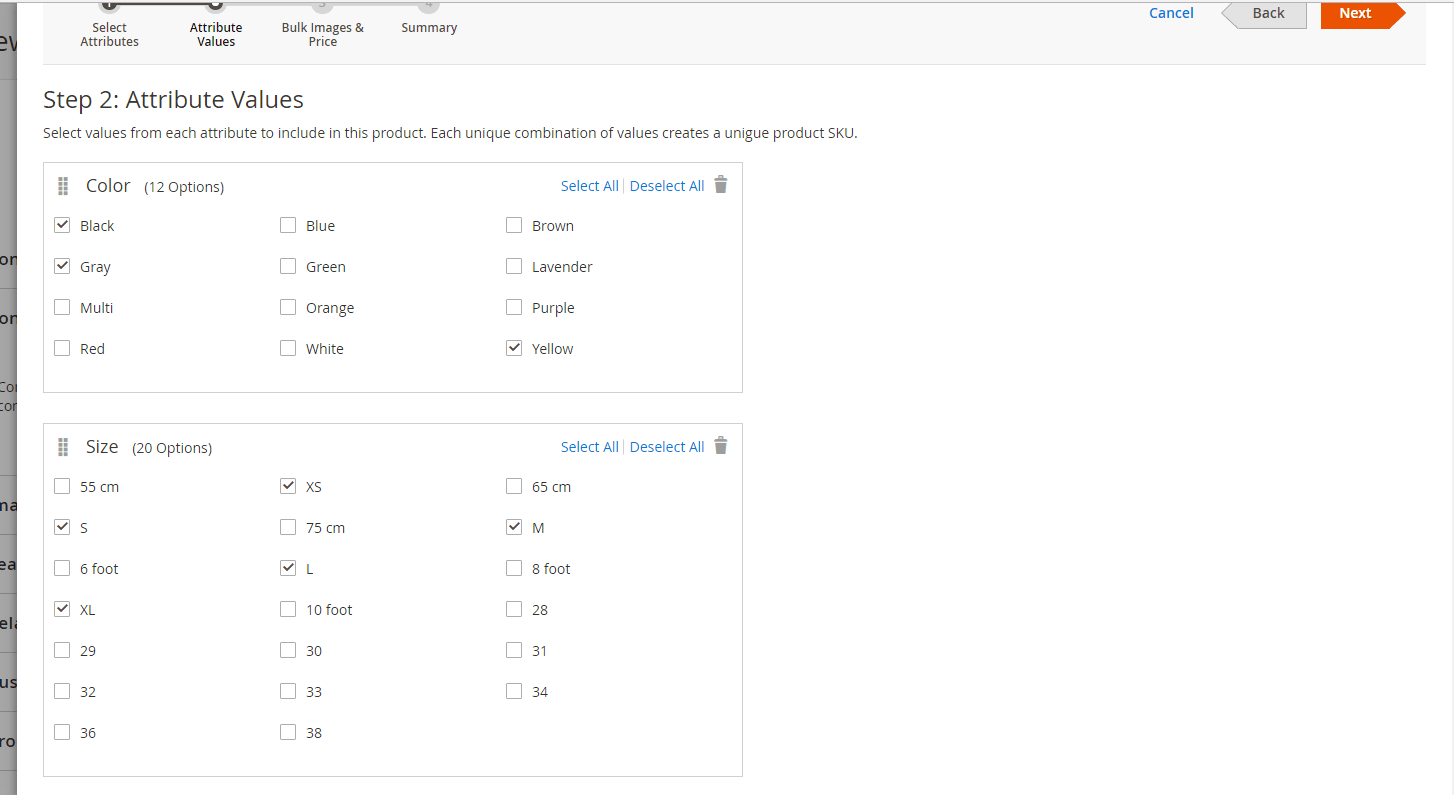
Step 7. Choose all the Attribute Values you want to apply to your product and click “Next”.
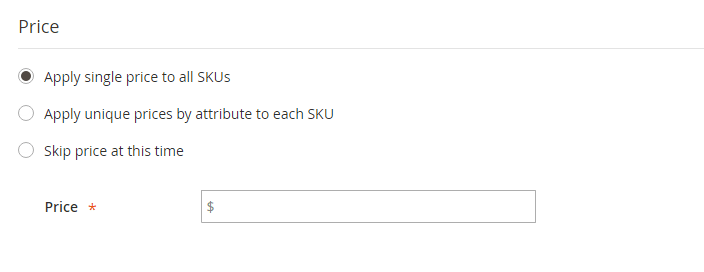
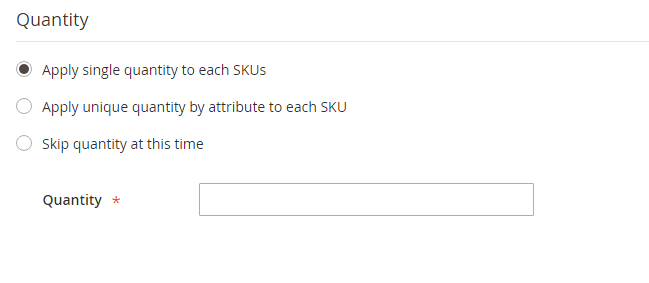
Step 8. The next step is going to be to configure Images, Price, and Quantities for your product. Here, you can customize each field for each product, giving each one a truly individual setup.
Once you’ve done this, click on “Generate Product” and add this product to your catalog. If you decide you want to change your Configuration details – click on “Edit Configuration” and make any changes you see fit.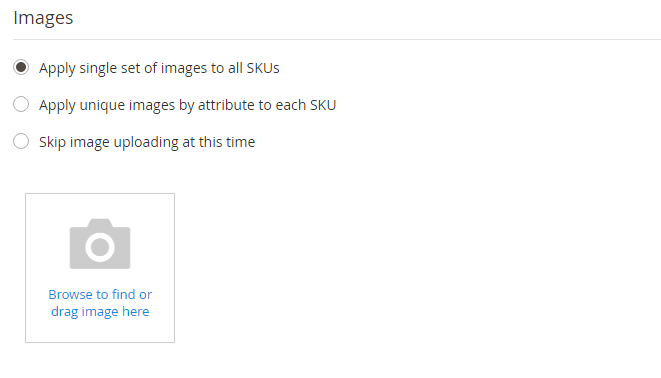
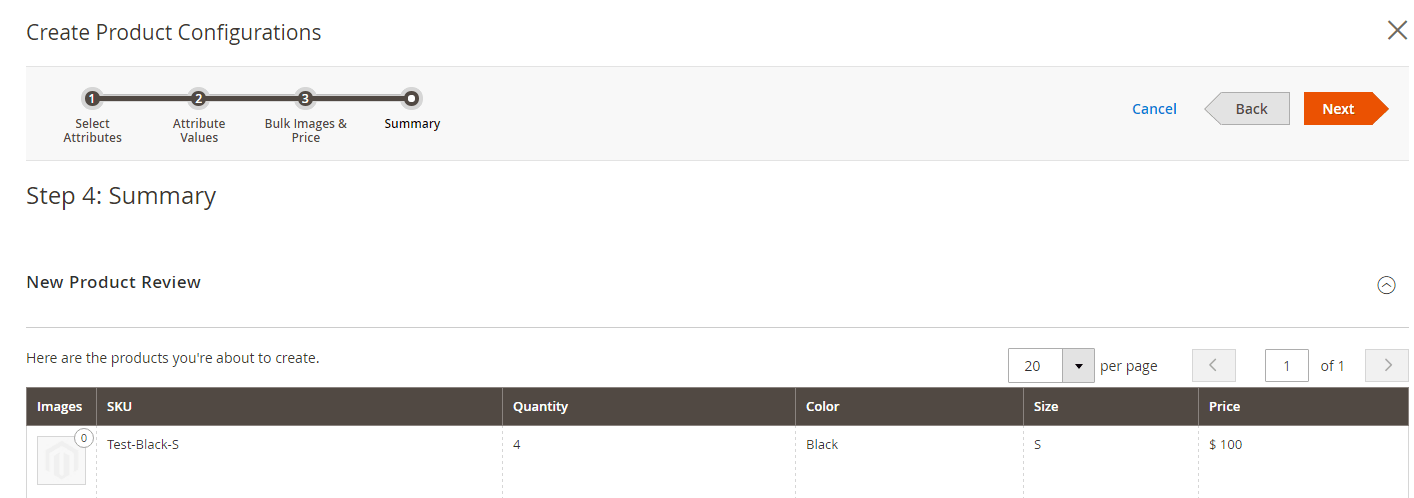
Step 9. In the Summary part you will see all the products you are about to create, in case you need to make any last minute adjustments.
And there you have it! Now you can publish the products. Just “Save & Close”.
Downloadable Products
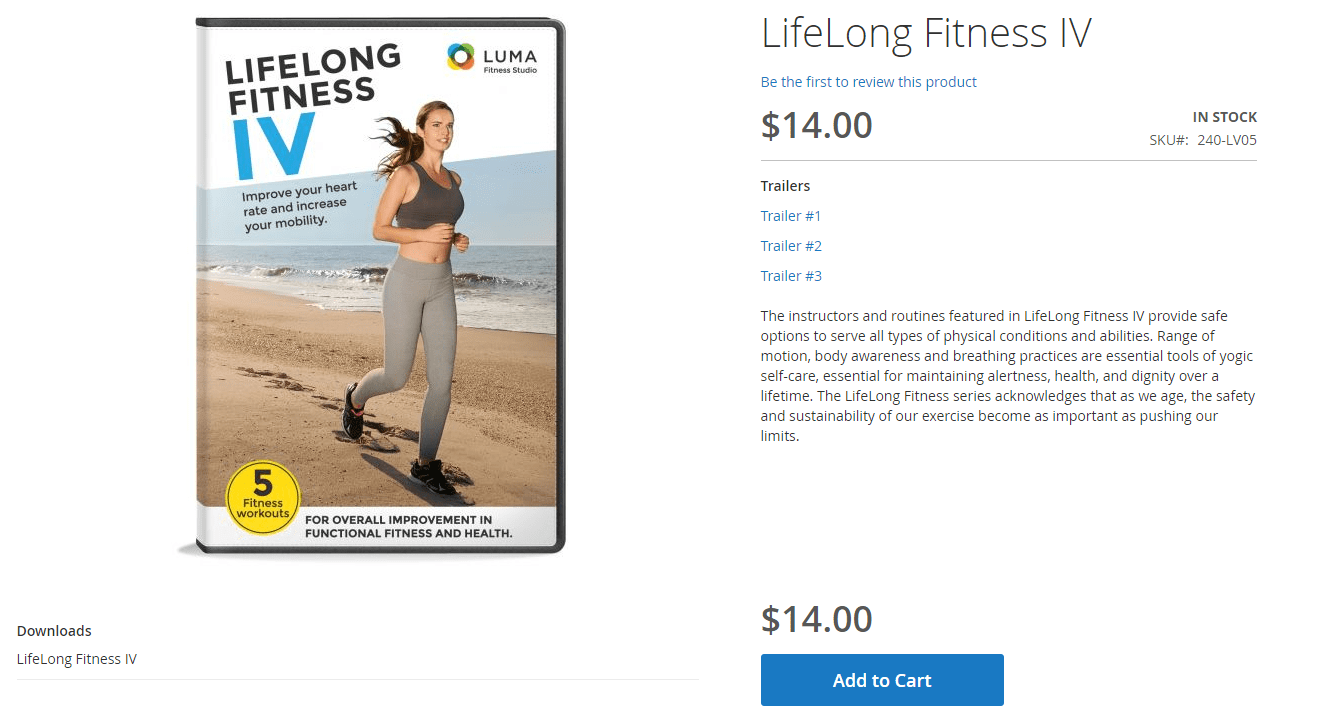
Downloadable Products don’t have a physical presence at your store, hence why we call them downloadable. However, they can be downloaded by customers from your website, so they’re still part of your inventory. A good example of downloadable products are ebooks, that are available to download by links which appear after customers make a payment.
Now that we’ve learned how to create touchable and smellable products, aka the tangibles, let’s move on to the kind of products that aren’t, so touchable and smelly. They can be delivered in the form of a file, like an eBook, video or music file, software, etc.
Step 3. Select the “Downloadable Product” option in the Add Product dropdown menu.
Step 4. Complete all the required fields.
Step 5. Include all the necessary Product Details in corresponding fields.

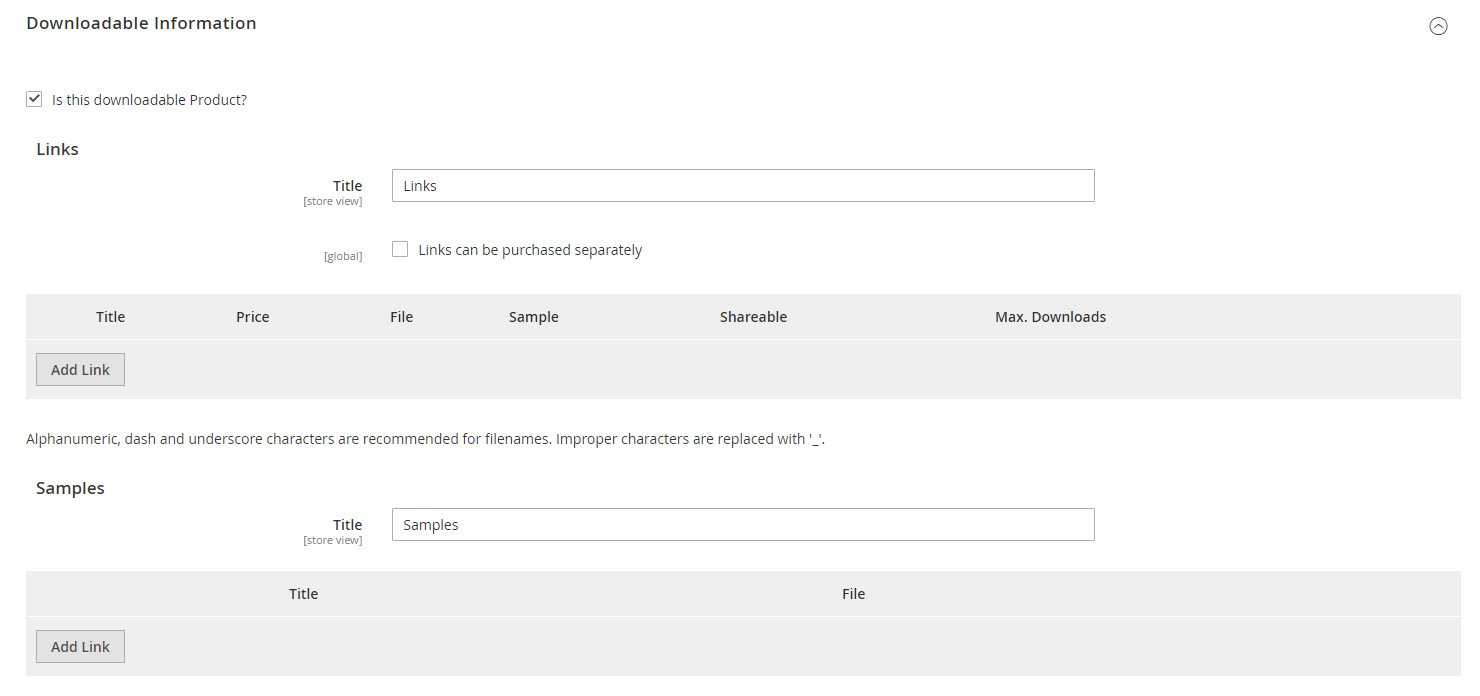
Step 6. This step is specific for this exact product type. Here you need to add all the Downloadable Information, things like Title, product Link, Samples, etc.
After all these steps are done, it’s time to generate your product by choosing the “Save & Close” option in the “Save” drop-down menu.
Virtual Products
Virtual Products aren’t physical ones either, similar to downloadable products. They can be services, membership, subscriptions, etc. and since they don’t have to be shipped, or tracked like a physical object they don’t require inventory tracking. As an example, it could be any service like a warranty sold along with an electronic device you’re purchasing.

What is the difference between Downloadable and Virtual products is you ask? In comparison to Downloadable products, Virtual products are more like add-ons that don’t have to be downloaded. Let’s see how easy it is to set up these products.
Step 3. Choose the product type:
Step 4. Complete all the required fields. You won’t see any new fields in this section, just the classics like Product Name, SKU, Price, availability, categories and a fewother parameters to set up.

Step 5. Complete the rest of your Product Details. The variety of options includes adding images and videos, setting up your product’s design as well as Up-Sell and Cross-Sell options, incorporating necessary SEO information, etc.
And that’s it you’ve created a Virtual product!
And one last thing, you’ve finally made it to the end of this article! We’d like to thank you for your interest, time, and patience as this article ran a bit longer than usual. Sometimes it happens, just like the checkout line at Starbucks; sometimes you win, sometimes you lose. Most importantly, we wanted to make these steps easy to follow and informative. Now that you know how to add any type of products in Magento 2 and there’s nothing to be afraid of, you can add new products to your catalog at any time quickly and painfully.
Hunting for Magento development support?
We’ll be in touch soon if you leave your contact information


