How to Add Microdata to Magento 2
This is about several ways of adding microdata to websites, particularly, to Magento online stores. Though microdata was introduced years ago, it’s implemented on a relatively small number of websites.
Previously in our blog, we have concentrated on content that may be useful for online merchants and those who want to move their businesses online. However, over the years, our team generated a lot of useful content for Magento developers as well, and it’s about time to share that with the community.
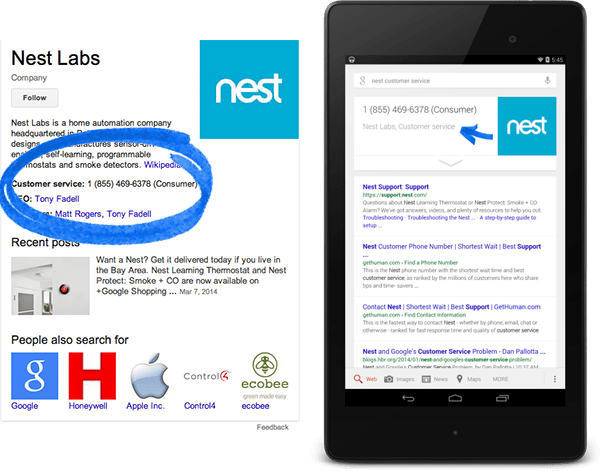
Our first article in the category “For Magento developers” is about several ways of adding microdata to websites, particularly, to Magento online stores. Though microdata was introduced years ago, it’s implemented on a relatively small number of websites. If you look at the image below, you will notice that one of these sites stands out more than the other. Those small rating stars make the site more noticeable and trustworthy for users, and this is just the tip of the iceberg, it gets better.

What is microdata?
Microdata is a structured data markup schema allowing search machines to structure and understand content from webpages. Put simply, it is a set of techniques that helps search machines distinguish a product page from a blog post page, and show web users more relevant and attractive results. When implemented on a site, microdata influences its rankings in the major search engines such as Google, Yandex, Bing and Yahoo!; and in most cases it makes site pages more compelling and visible for prospective users.
So let’s take a closer look at microdata to see its specific concept and how it may be implemented in Magento.
Microdata lets you add structured markup to any HTML standardized element, and won’t cause problems with browsers that do not support it. The main microdata source is Schema.org. It contains more than 100 schemes (rules of microdata processing for certain object types) that may be used for web sites. These are just some of the most popular schemes:
- Products
- People
- Events
- Organizations
- Videos
- Comments
- Photos
- Recipes
- Articles
- Schedules
The full list of schemes is available here. Basically, there’s a special markup for all possible information types.
How to implement schemes?
First of all, you must select an object type. In the list with schemes, you can find the name of the scheme you need and its attributes description. For example, you want to implement microdata on the product page of Magento.
This is actually the scheme that you can use.
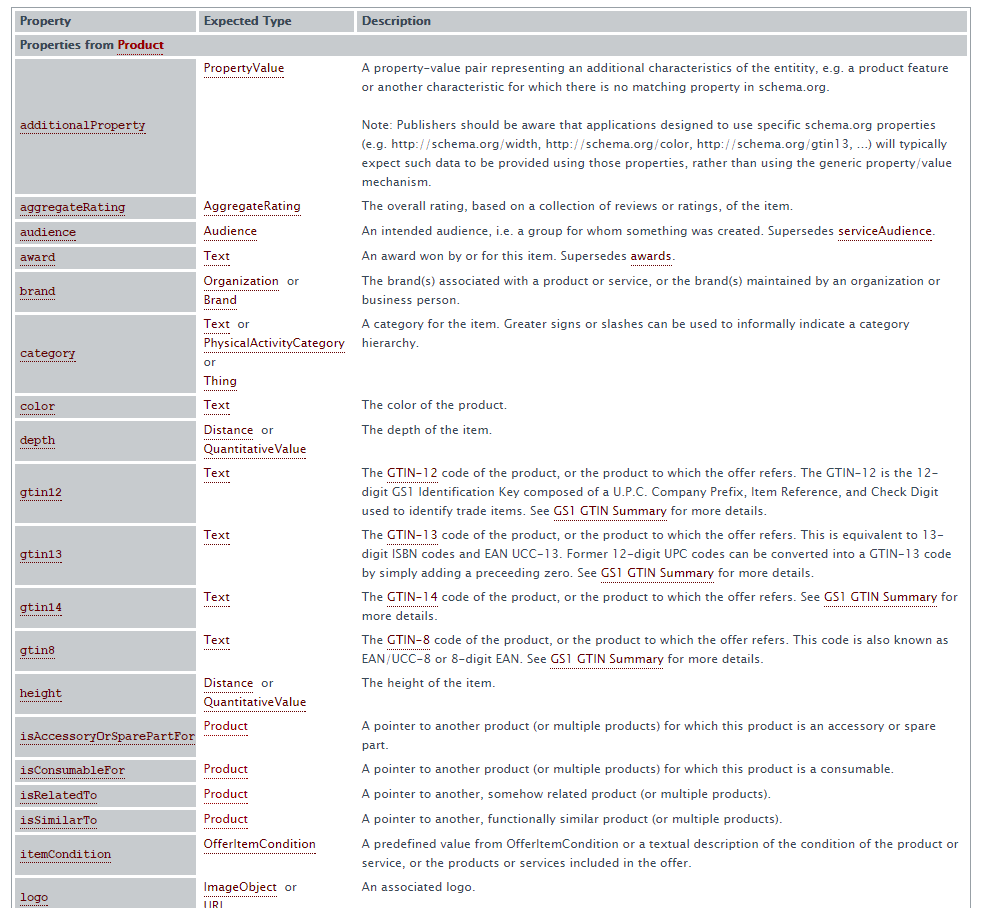
There are lots of options but let’s select the most important ones:
- name — the name of the product
- image — the picture of the product
- description — the main information about the product
- sku — the unique identifier of the product
- brand — the product’s producer
- aggregateRating — the product’s rating
- offers — the object’s properties related to its purchase. In our case it contains price currency, price, and availability.
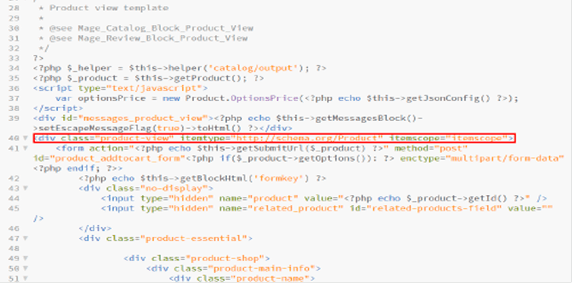
We add itemtype=”http://schema.org/Product” itemscope to the main div to indicate that everything that is contained inside this block is related to the product.
itemtype=”http://schema.org/Product” is the object type indicator, and itemscope shows that the object will contain options. Since each object has it’s own set of options, it’s something you must configure each time you describe an object or embedded object. For example, the object which means “product” will include some parameters, name, price, description, etc. described below, as well as objects like ratings and reviews.
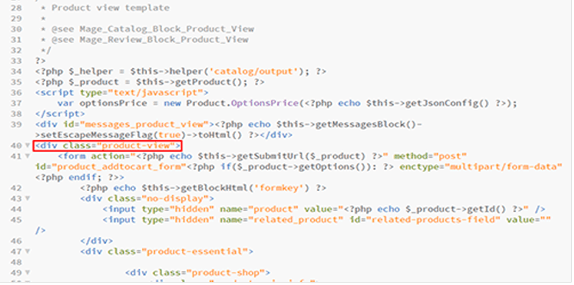
To help the system to understand that there is something inside we need to use “itemscope” We select div with class “product-view” in the file \template\catalog\product\view.phtml
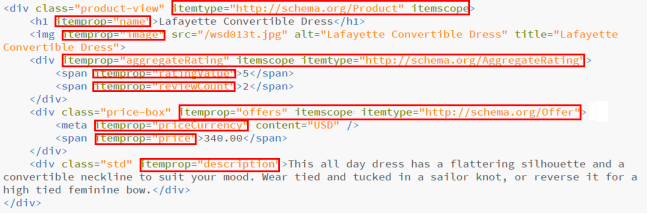
Here’s what we have before:
And what we have after:
In the line with the name of the product we add itemprop=”name” which will indicate that this line contains the name of the product.
Tag <h1> would be appropriate for this reason, in the same file. The main image of the product will also come in handy.
In this theme it is <img> with id=”image-main” which is located in the file \template\catalog\product\view\media.phtml.
We’ll add <img/> itemprop=”image” to make search engines understand, that it’s an image of the product.
Now let’s proceed to ratings. This part is a little more complicated if we talk about a default Magento theme, because the initial rating structure is not eligible for microdata and not very informative, that’s why we need to add some additional lines to the file \template\review\helper\summary.phtml:
<div style="display: none;" itemprop="aggregateRating" itemscope itemtype="http://schema.org/AggregateRating">
   <span itemprop="ratingValue"><?php echo ($this->getRatingSummary()*5)/100 ?></span>
   <span itemprop="reviewCount"><?php echo $this->getReviewsCount() ?></span>
</div>
itemprop=”aggregateRating” represents the object, which will contain the rating value, and itemscope means that there will also be some object properties inside.
itemprop=”ratingValue” represents the rating value and itemprop=”reviewCount” represents the number of comments.
Let’s come back to the file \template\catalog\product\view.phtml which is the product page template.
Now add itemprop=”description” on the block with description and it’ll update the product’s description. For this reason we chose <div> which contains data for a short description. More specifically, <div> with class=”std”, which is located in <div class=”short-description”>. We could choose full description, but I decided that the short one would be enough.
And the most important – offers. That is a special object, which is in charge of selling, offers etc.
On the block, which will contain prices, availability etc. we have to add attributes itemprop=”offers”
itemscope itemtype=”http://schema.org/Offer” indicating that this is an “offers” object, which will contain properties.
In this section, add the following: <meta itemprop=”priceCurrency” content=”USD”/>. This states currency. Also add itemprop=”price” on the block with price, which in no uncertain terms, creates the product’s price data.
I.e. the price will look something like this:
 <div class="price-box" itemprop="offers" itemscope="" itemtype="http://schema.org/Offer">
       <meta itemprop="priceCurrency" content="USD">
      <span class="price" itemprop="price">$340.00</span>
 </div>
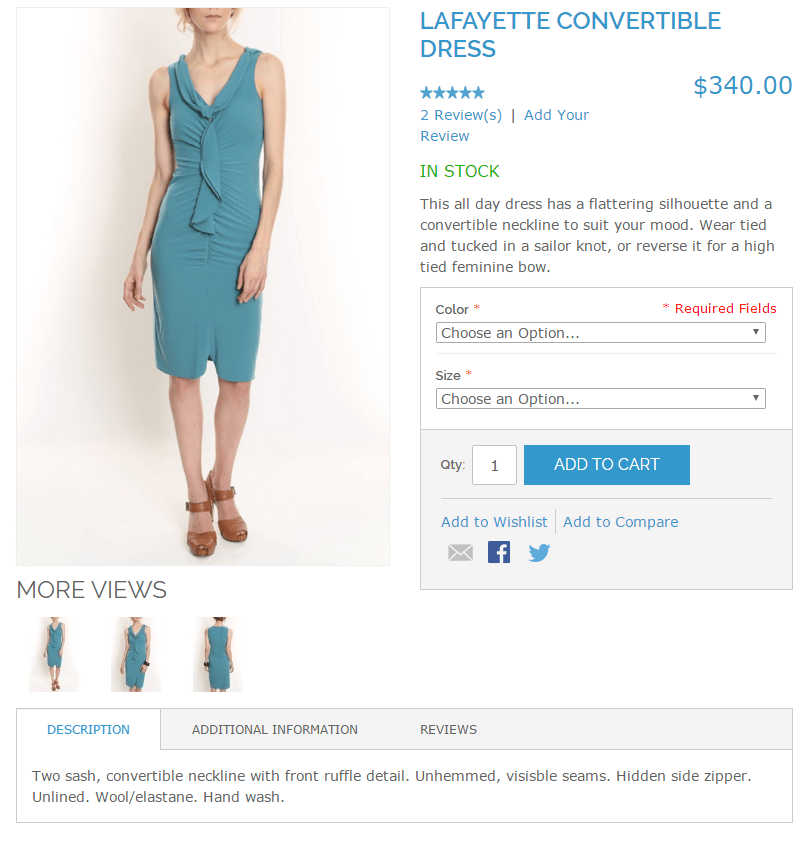
This is it. If everything is done correctly, this page will look like this:
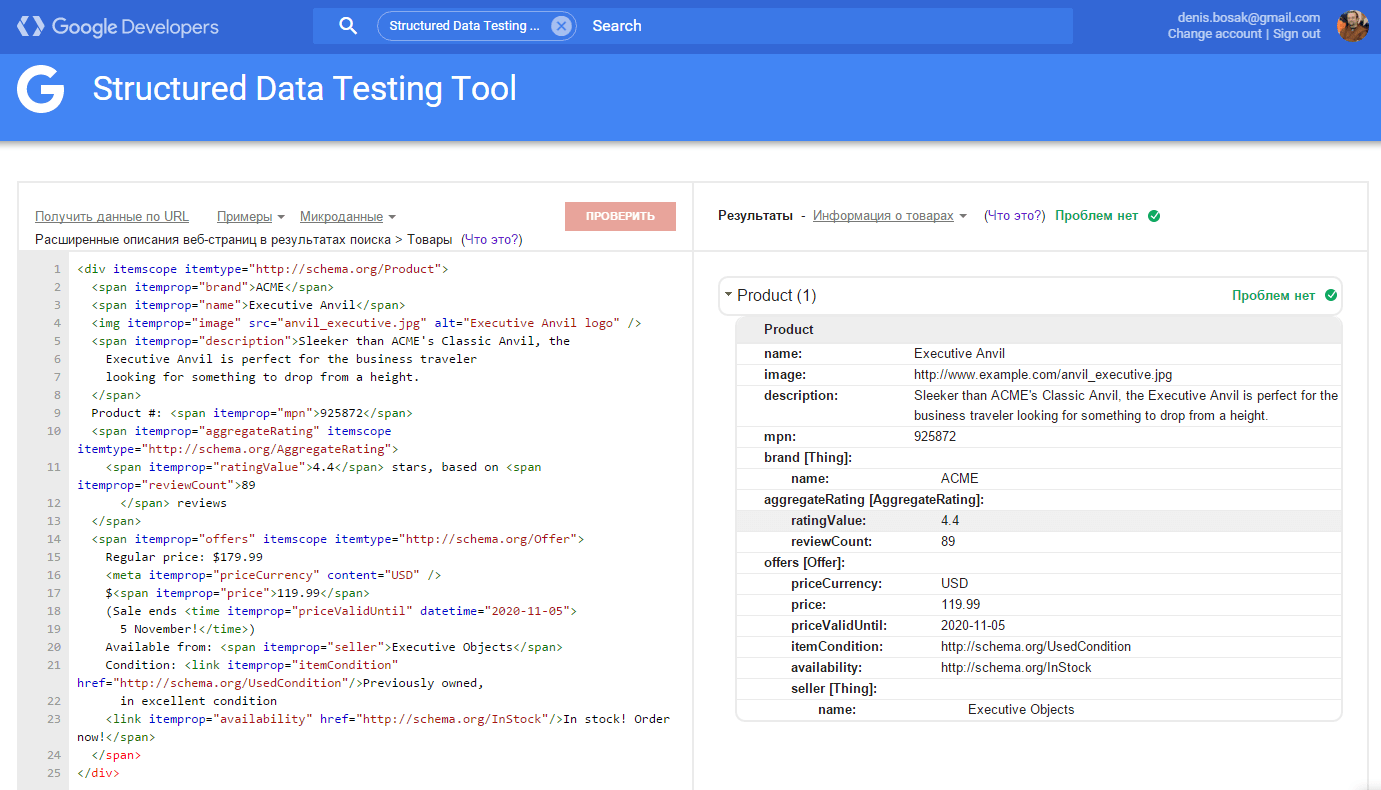
By the way, you can check accuracy of your schemes with help of the Structured Data Testing Tool from Google. You can either copy the code there or provide the link of the page, which requires testing.
Also, a similar service is provided by Yandex validator. However, it’s not everything we could hope for in a microdata. For instance, we could point out the brand, seller, weight, color, time of price relevance and other properties of the product. But currently provided information will fundamentally simplify the searching procedure.
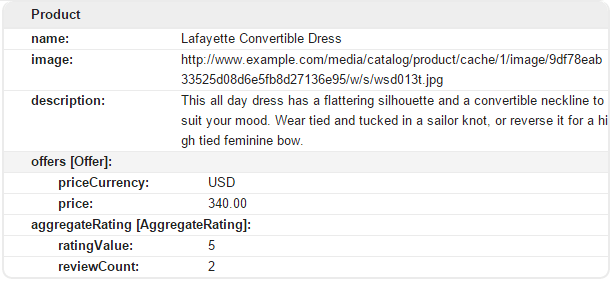
And in search results our product is going to look like this:

And this is how the markup is going to look like:
We’ve simplified the markup intentionally, deleting unnecessary (at this moment) elements to leave only the most important information for the markup content.
Thus, it’s quite easy to create a search-engine-friendly website without making changes in layout, but by adding simple attributes. Consequently it makes such a website more user-friendly, which is crucial for webstores.
That being said, there’s one more way of introducing microdata that we’d like to mention – JSON-LD. In contrast from the way we used earlier information, this will be introduced not by means of attributes, but of JSON. It can be more convenient, because all the information is specified in one place. In our case it’ll look like this:
<script type="application/ld+json">
{
  "@context": "http://schema.org",
  "@type": "Product",
  "aggregateRating": {
	"@type": "AggregateRating",
	"ratingCount": "2",
	"ratingValue": "5"
  },
  "image": "/wsd013t.jpg",
  "name": "Lafayette Convertible Dress",
  "description": "This all day dress has a flattering silhouette and a convertible neckline to suit your mood. Wear tied and tucked in a sailor knot, or reverse it for a high tied feminine bow.",
  "offers": {
	"@type": "Offer",
	"priceCurrency": "USD",
	"price": "$340.00"
  }
}
</script>
As you’ve probably noticed, here we have the same names of objects and properties as we specified with help of attributes. Such code can be validated by means of the same validators. Both ways are equal, so it’s up to you which of them to use. Nevertheless the first method is more popular and flexible (information is taken out of the same blocks in which it’s displayed on the page. You don’t need to display it in a special place) but the second is easier in implementing and understanding (you don’t need to move from one necessary template to another, everything’s located in one place). Some prefer to use both ways simultaneously to be 100% sure, although it’s not something we’d recommend. It’s not like it’s going to end in smoke and flames but, it might not be worth the time to double all the information.
Before we finish, it’s worth mentioning one more microdata scheme: Organization. Because it would be a reasonable request to show the company’s logo.
Google recommends to do it like this:
<div itemscope itemtype="http://schema.org/Organization">
   <a itemprop="url" href="http://www.example.com/">Home</a>
   <img itemprop="logo" src="http://www.example.com/images/logo.png" />
</div>
In JSON-LD it’ll be like this:
<script type="application/ld+json">
{
  "@context": "http://schema.org",
  "@type": "Organization",
  "url": "http://www.example.com",
  "logo": "http://www.example.com/images/logo.png"
}
</script>
It’s also a good idea to show contact information for the company:
<div itemscope itemtype="http://schema.org/Organization">
  <span itemprop="name">Google.org (GOOG)</span>
  Contact Details:
  <div itemprop="address" itemscope itemtype="http://schema.org/PostalAddress">
  Main address:
    <span itemprop="streetAddress">38 avenue de l'Opera</span>
    <span itemprop="postalCode">F-75002</span>
    <span itemprop="addressLocality">Paris, France</span> ,
  </div>
  Tel:<span itemprop="telephone">( 33 1) 42 68 53 00 </span>,
  Fax:<span itemprop="faxNumber">( 33 1) 42 68 53 01 </span>,
  E-mail: <span itemprop="email">secretariat(at)google.org</span>
  Members:
  - National Scientific Members in 100 countries and territories: Country1, Country2, ...
  - Scientific Union Members, 30 organizations listed in this Yearbook:
  List of Alumni:
   <span itemprop="alumni" itemscope itemtype="http://schema.org/Person">
   <span itemprop="name">Jack Dan</span>
  </span>,
  <span itemprop="alumni" itemscope itemtype="http://schema.org/Person">
   <span itemprop="name">John Smith</span>
  </span>,

History:
</div>
JSON-LD:
<script type="application/ld+json">
{
  "@context": "http://schema.org",
  "@type": "Organization",
  "address": {
	"@type": "PostalAddress",
	"addressLocality": "Paris, France",
	"postalCode": "F-75002",
	"streetAddress": "38 avenue de l'Opera"
  },
  "email": "secretariat(at)google.org",
  "faxNumber": "( 33 1) 42 68 53 01",
  "member": [
	{
  	"@type": "Organization"
	},
	{
  	"@type": "Organization"
	}
  ],
  "alumni": [
	{
  	"@type": "Person",
  	"name": "Jack Dan"
	},
	{
  	"@type": "Person",
  	"name": "John Smith"
	}
  ],
  "name": "Google.org (GOOG)",
  "telephone": "( 33 1) 42 68 53 00"
}
</script>
In practice, it’ll look like this:
So, everything’s great but the article won’t be complete, if we don’t talk about one more way to introduce information about your site and Open Graph protocol. This protocol is used by social networking sites like Facebook. We recommend using this protocol on all the pages along with the microdata we’ve described above.
So you at this point you might think,”What do we need it for?” For example to be able to publish your pages like this:
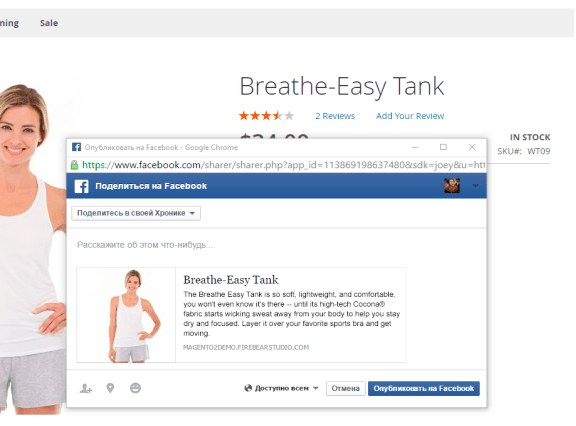
To use Open Graph you’ll need to use meta tags, which you have to place in <head> section of your page.
Basic tags are the following:
og:title – heading, product name etc. For instance, you can see it in the image above, it’s “Breathe-Easy Tank”.
og:type – object type. They can be different. In our example it’s «og:product», which indicates the product.
og:image – image displayed when publishing.
og:description – publication description.
og:url – link of the page, which can be followed after you’ve read a publication on social networking sites.
Here’s an example of og tags for the page above:
<meta property=”og:type” content=”og:product”>
<meta property=”og:title” content=”Breathe-Easy Tank”>
<meta property=”og:image” content=”http://sample.com/pub/media/wt09-white_main.jpg”>
<meta property=”og:description” content=” The Breathe Easy Tank is so soft, lightweight, and comfortable, you won’t even know it’s there — until its high-tech Cocona® fabric starts wicking sweat away from your body to help you stay dry and focused. Layer it over your favorite sports bra and get moving. “>
<meta property=”og:url” content=” http://sample.com/breathe-easy-tank.html”>
As you can see everything’s quite easy to implement.
To get some more detailed information on this protocol you can go here to read more.
To test your page and to see what it’ll look like, you can use Facebook Debugger.
Lastly, as you can see, with help of microdata and Open Graph you can make your site more search engine & social network friendly, and consequently, improve on user-friendliness. With changes like these, it’ll be even easier for users to find necessary information and share it with their friends. That’s why we recommend taking the time to implement a few changes with tools like these, you definitely won’t regret it.
Hunting for Magento development support?
We’ll be in touch soon if you leave your contact information


